⚠️ Sunset Notice: This service will be discontinued as of September 30th, 2023. Learn more »
Did you come here for Live Video Shopping?
This is documentation for Bambuser Live Streaming SDK.
If you're looking for documentation regarding Live Video Shopping (opens new window) , see these pages (opens new window)
How to create a live video player app in Java using Android Studio
This guide focuses on the minimum required to start playback in an Android app written in Java and built using Android Studio 3.5.3. You can find Android Studio on developer.android.com/studio (opens new window).
For simplicity, this example loads the latest broadcast available through the broadcast metadata API (opens new window).
Create a new Application
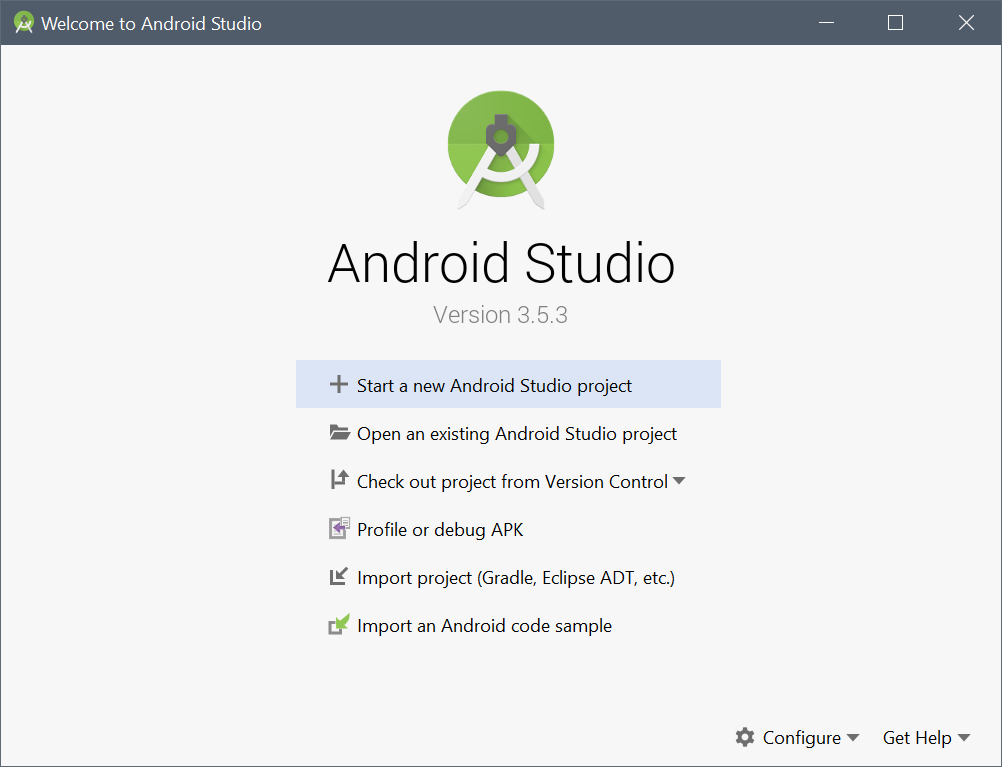
- Open Android Studio
- Choose
Start a new Android Studio project
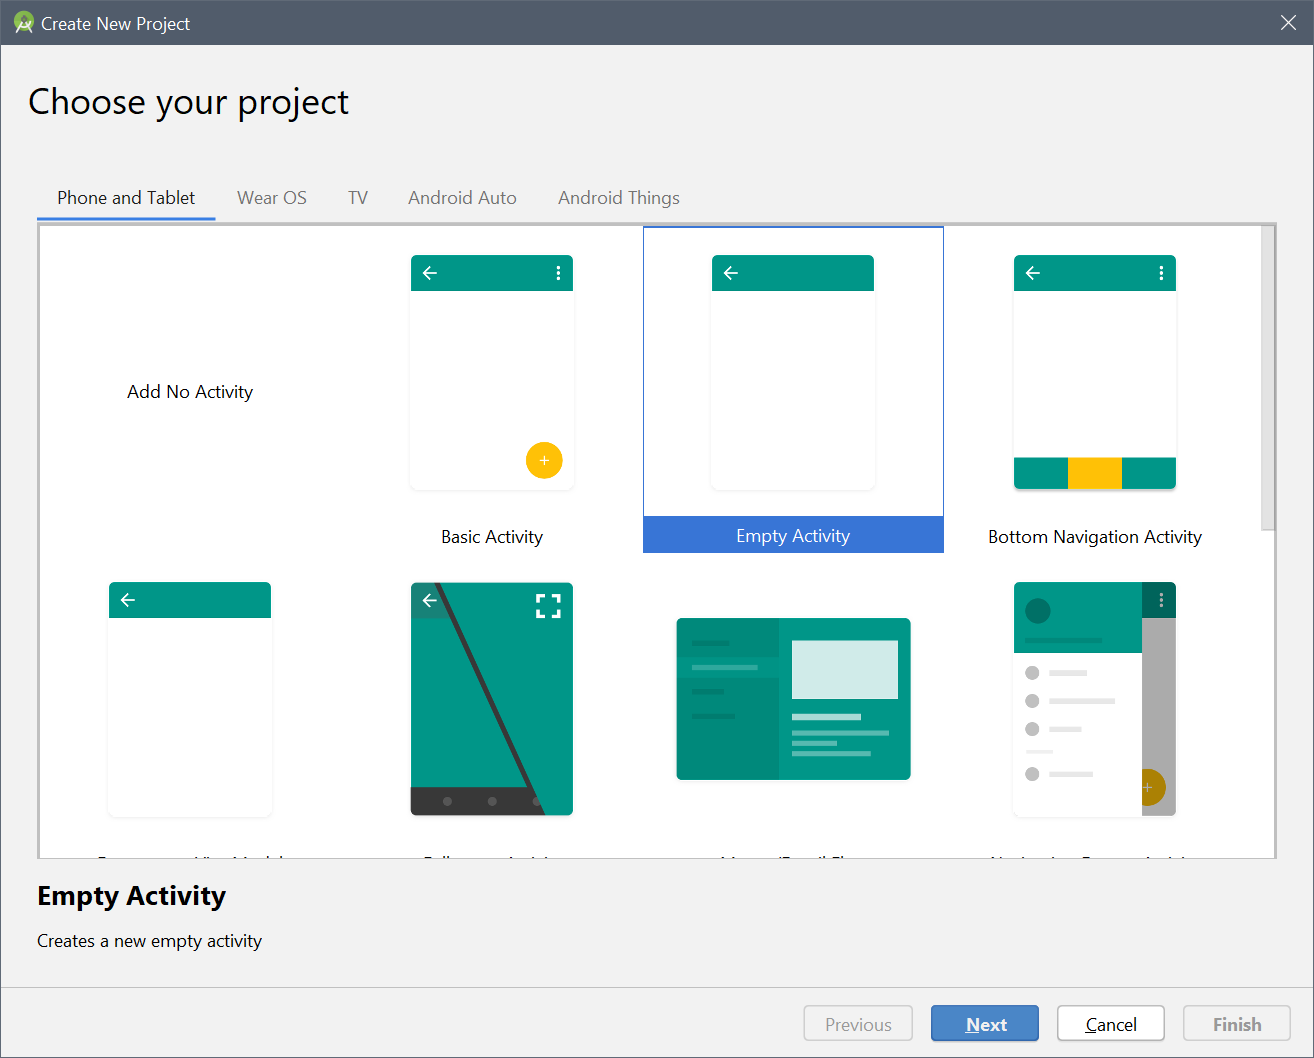
- Select the
Phone and Tabletform factor. - Choose the
Empty Activitytemplate.
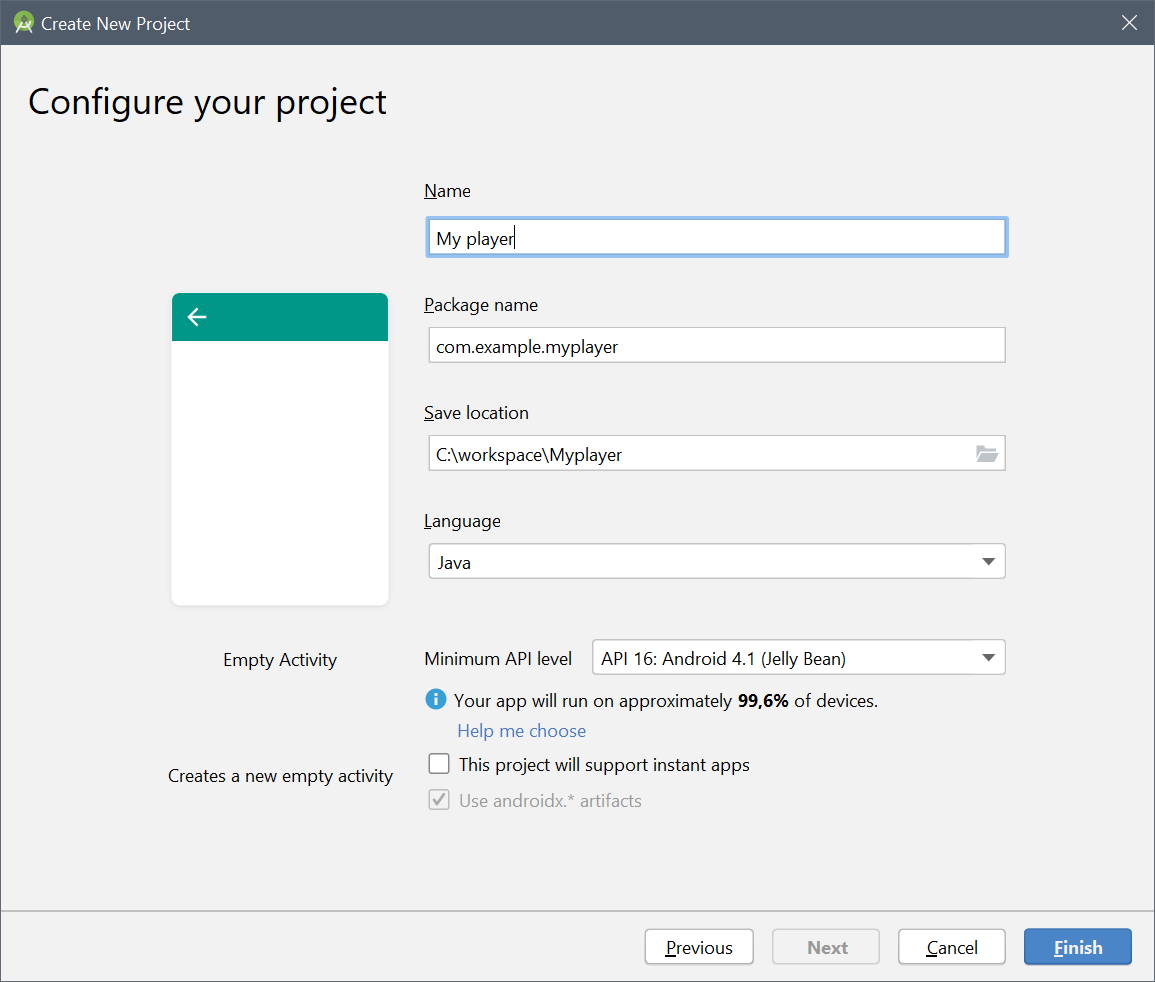
- Enter a suitable application name and your company domain.
- Set the Minimum SDK to at least
API 21: Android 5.0, which is the oldest API supported by the BroadcastPlayer (opens new window).
Add the Bambuser SDK for Android
- Log in to the Bambuser site and download the latest SDK bundle for Android from the Developer (opens new window) page.
- Open the downloaded zip file and extract it.
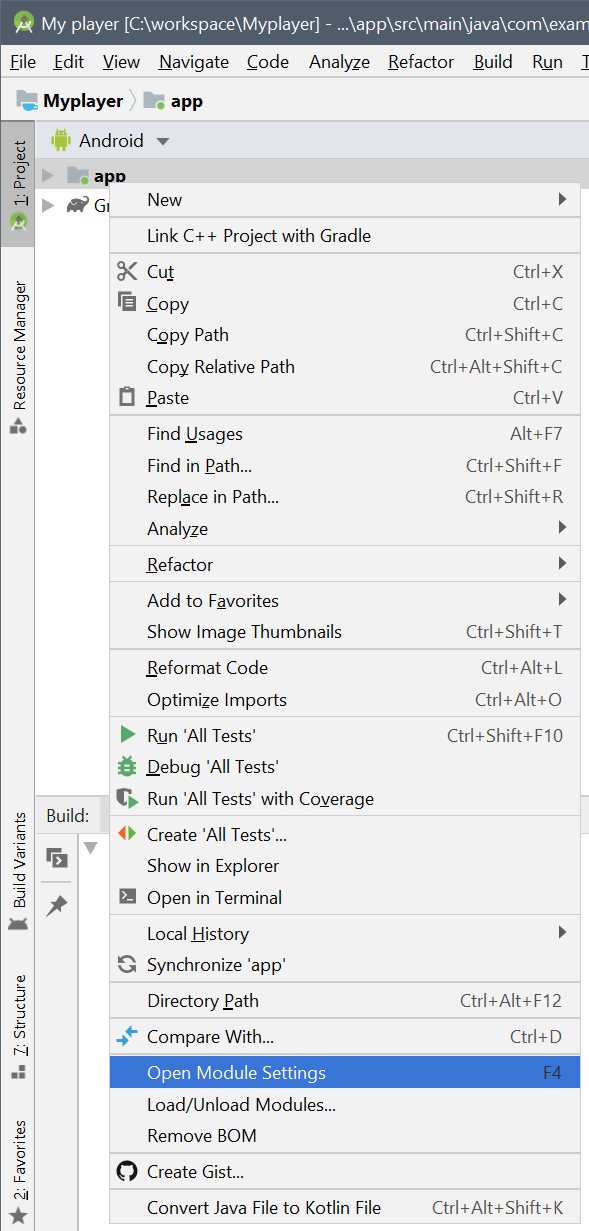
- In Android Studio, in the project tree on the left-hand-side, right click on your
appmodule and chooseOpen Module Settings.
- Click the + in the upper left corner of the list of modules.
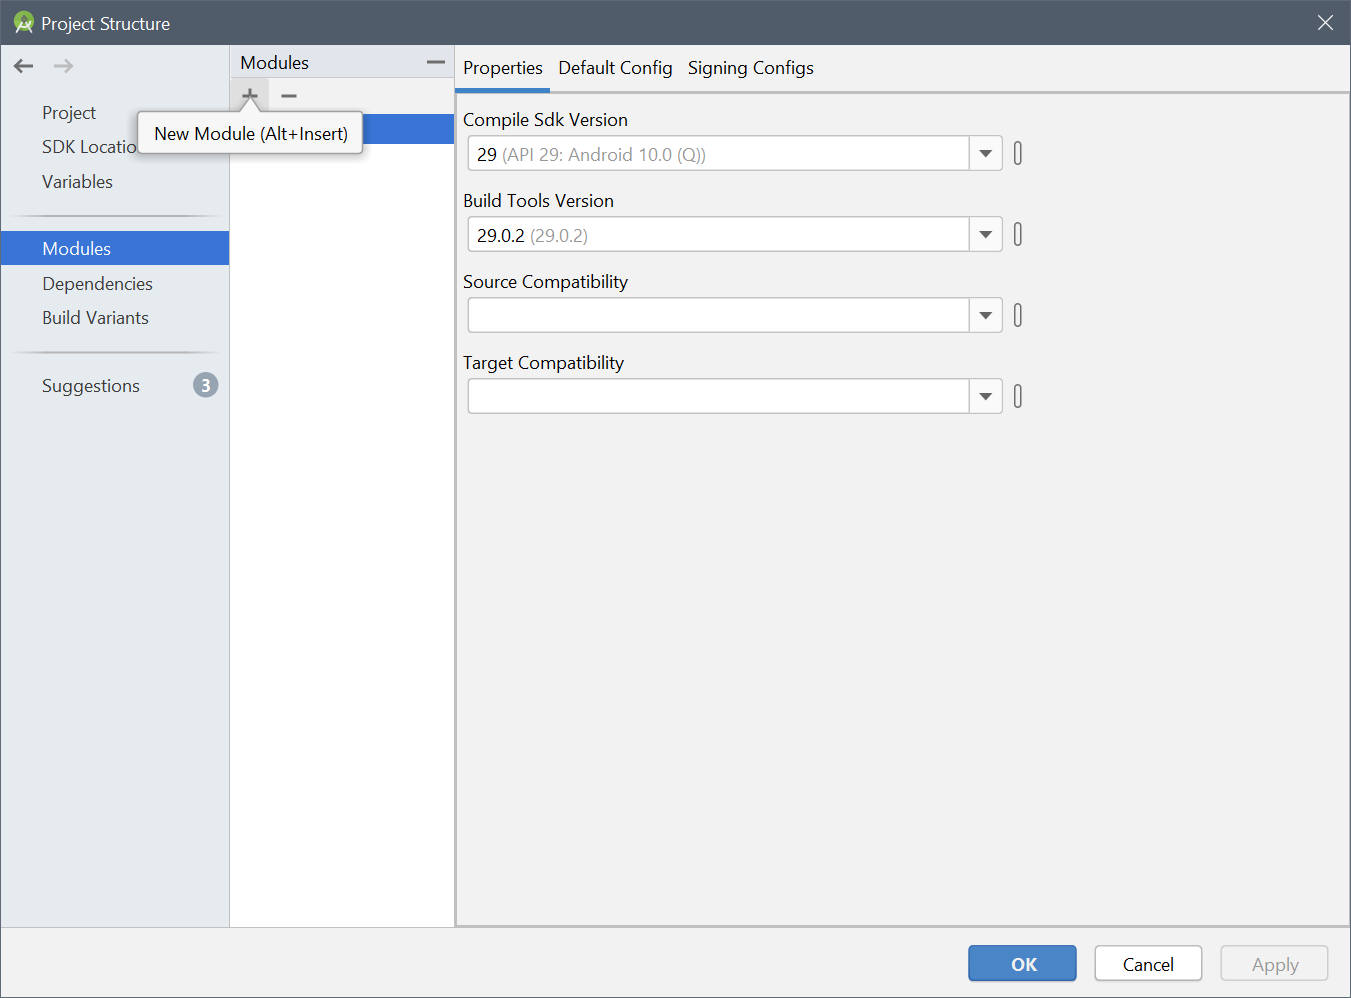
- Choose
Import .JAR/.AAR Package.
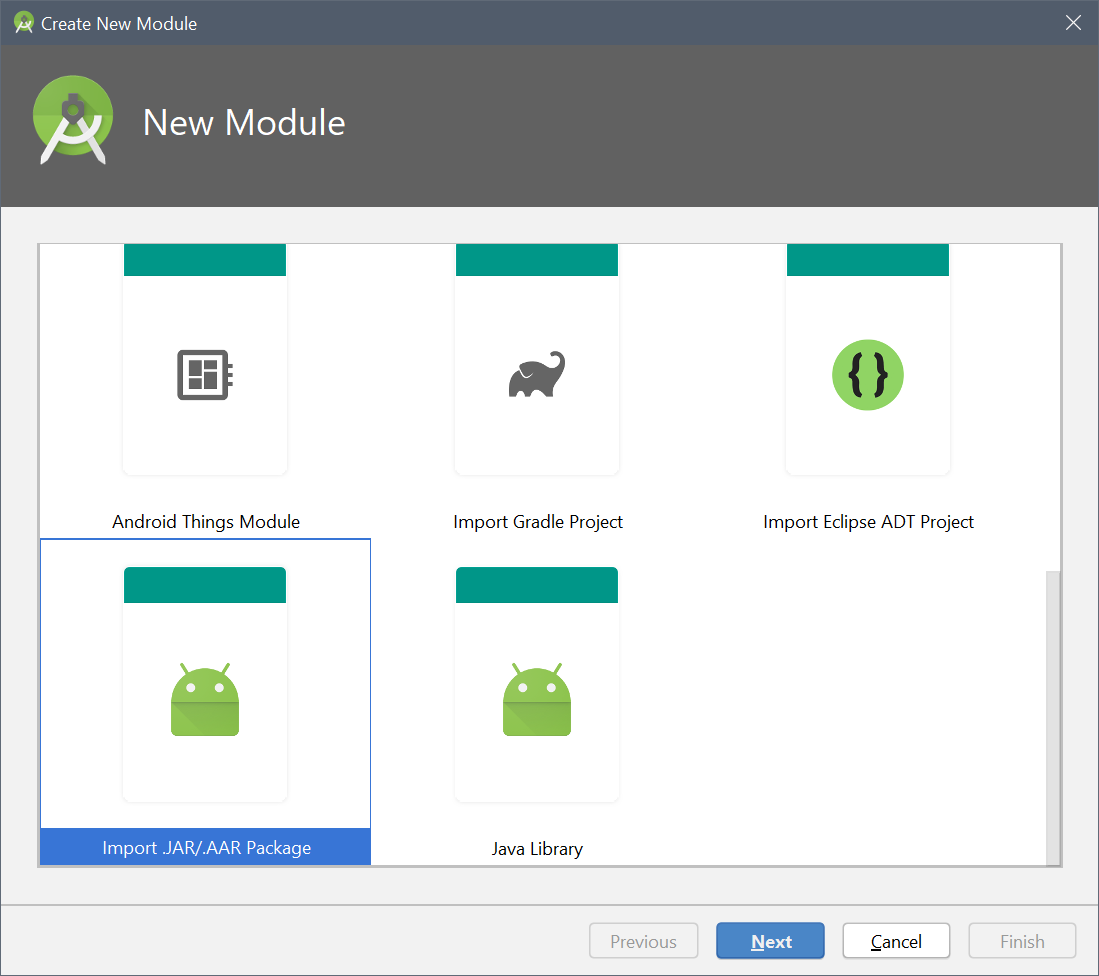
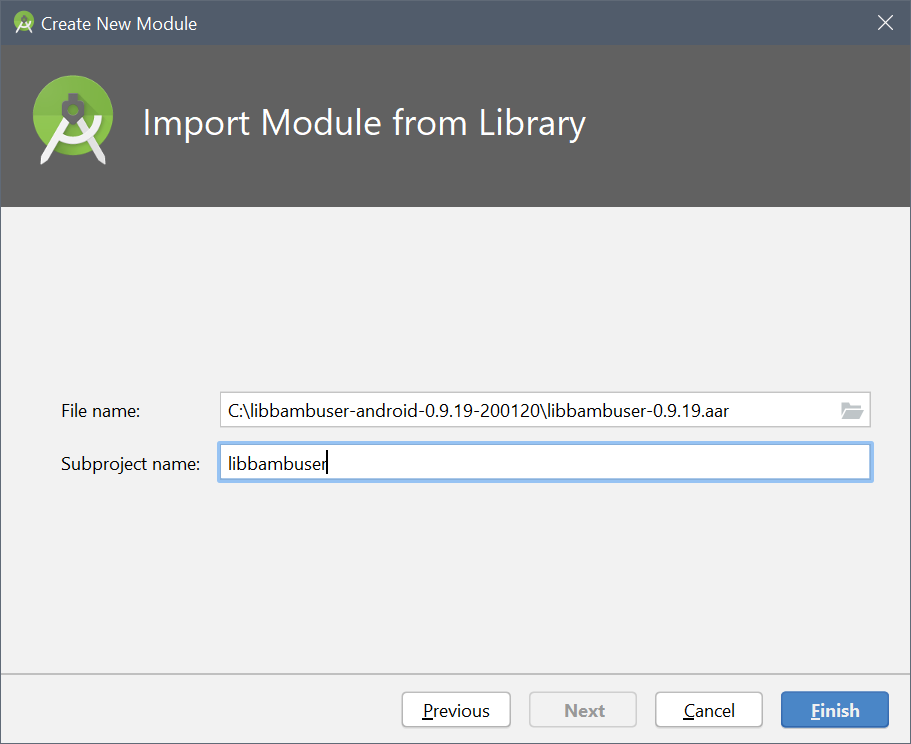
- Navigate to the SDK files you extracted and import the
.aarfile.
You may now need to close and reopen the Project Structure screen, for the library module
to show up in the list. Some recent versions of Android Studio fail to add new modules to the
settings.gradle file. If this happens, add include ':libbambuser' manually at the end of
the file and sync the project, then reopen the Project Structure screen.
- Switch to the Dependencies tab and keep the
appmodule selected. - Click the + in the dependency pane and choose Module dependency.
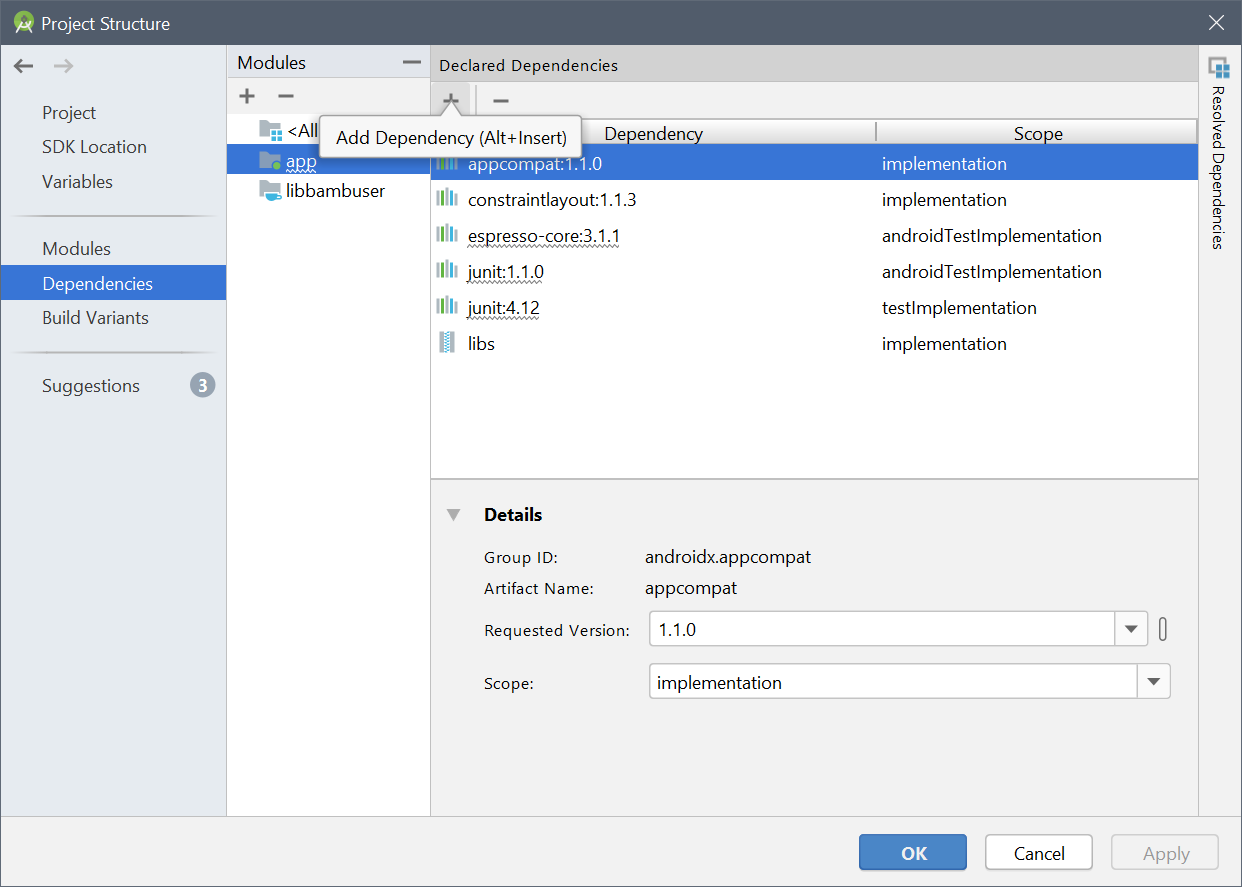
- Choose the imported library module, click OK

In order to do http requests in a convenient way, add a dependency on the OkHttp (opens new window) library.
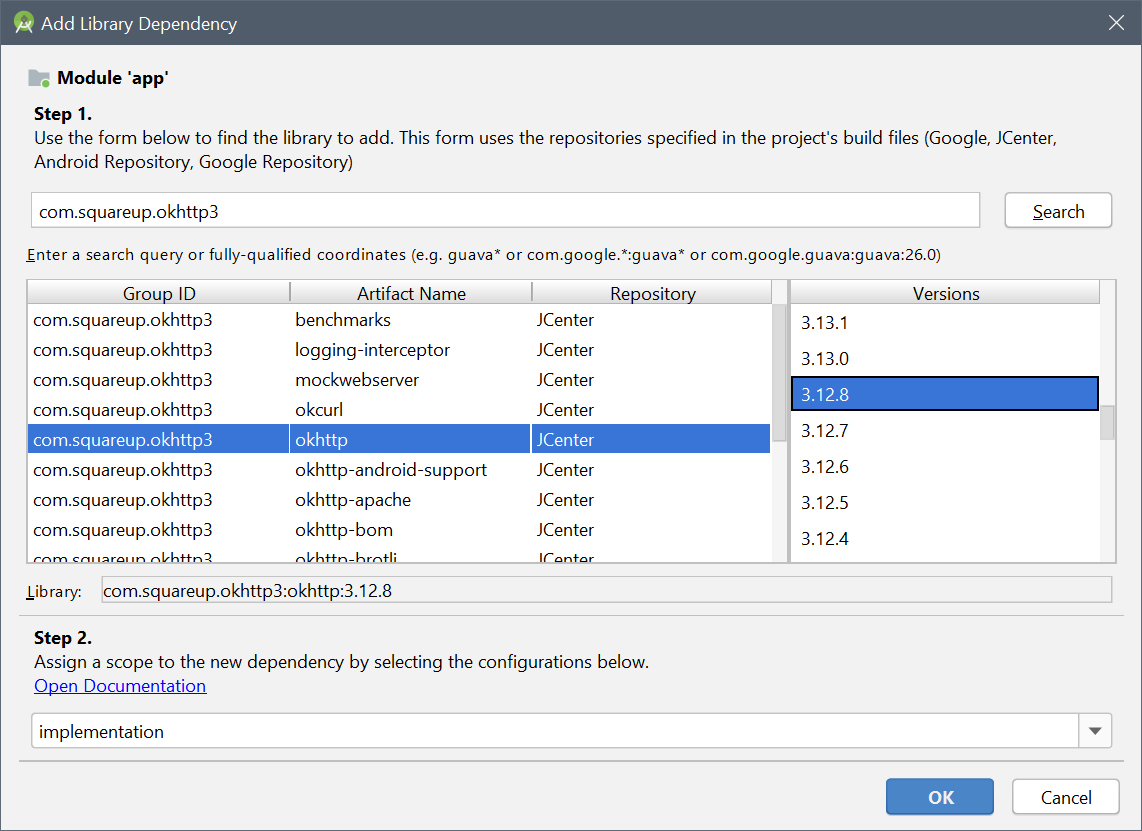
Click the + in the dependency pane again and choose Library dependency.
Search for
com.squareup.okhttp3and choose version 3.12 of the library, as shown below. This is the last branch to support down to Android API 16.
The list of dependencies for the app should now contain both the libbambuser module and the okhttp library.
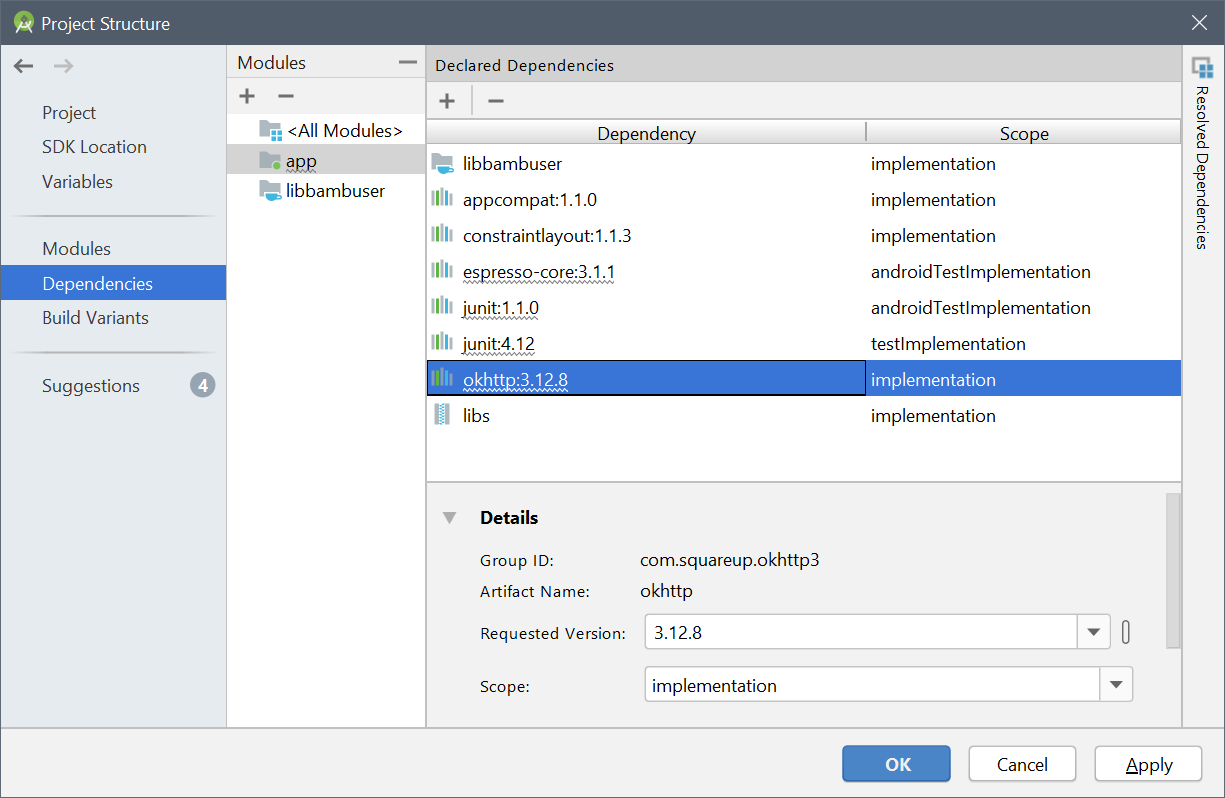
- Click OK to return from the Project Structure screen.
Configure Gradle to build for supported architectures
The Bambuser SDK contains native code built for the armeabi-v7a, arm64-v8a, x86
and x86_64 ABIs (opens new window). If you don't want to
bundle all of them, or if other libraries contain native code for other architectures, an ABI filter
is needed to ensure that the generated APK contains the greatest common denominator.
The armeabi-v7a and arm64-v8a ABIs (opens new window) are
compatible with all modern devices and ARM emulator images. The x86 and x86_64 ABIs are in practice
only necessary when developing on x86 emulator images, as real x86 devices can translate ARM machine code.
Open the
build.gradlefile for theappmodule.Add an NDK ABI filter to the android defaultConfig block. For example:
android {
    defaultConfig {
        // ...
        ndk {
            abiFilters 'armeabi-v7a', 'arm64-v8a'
        }
    }
}
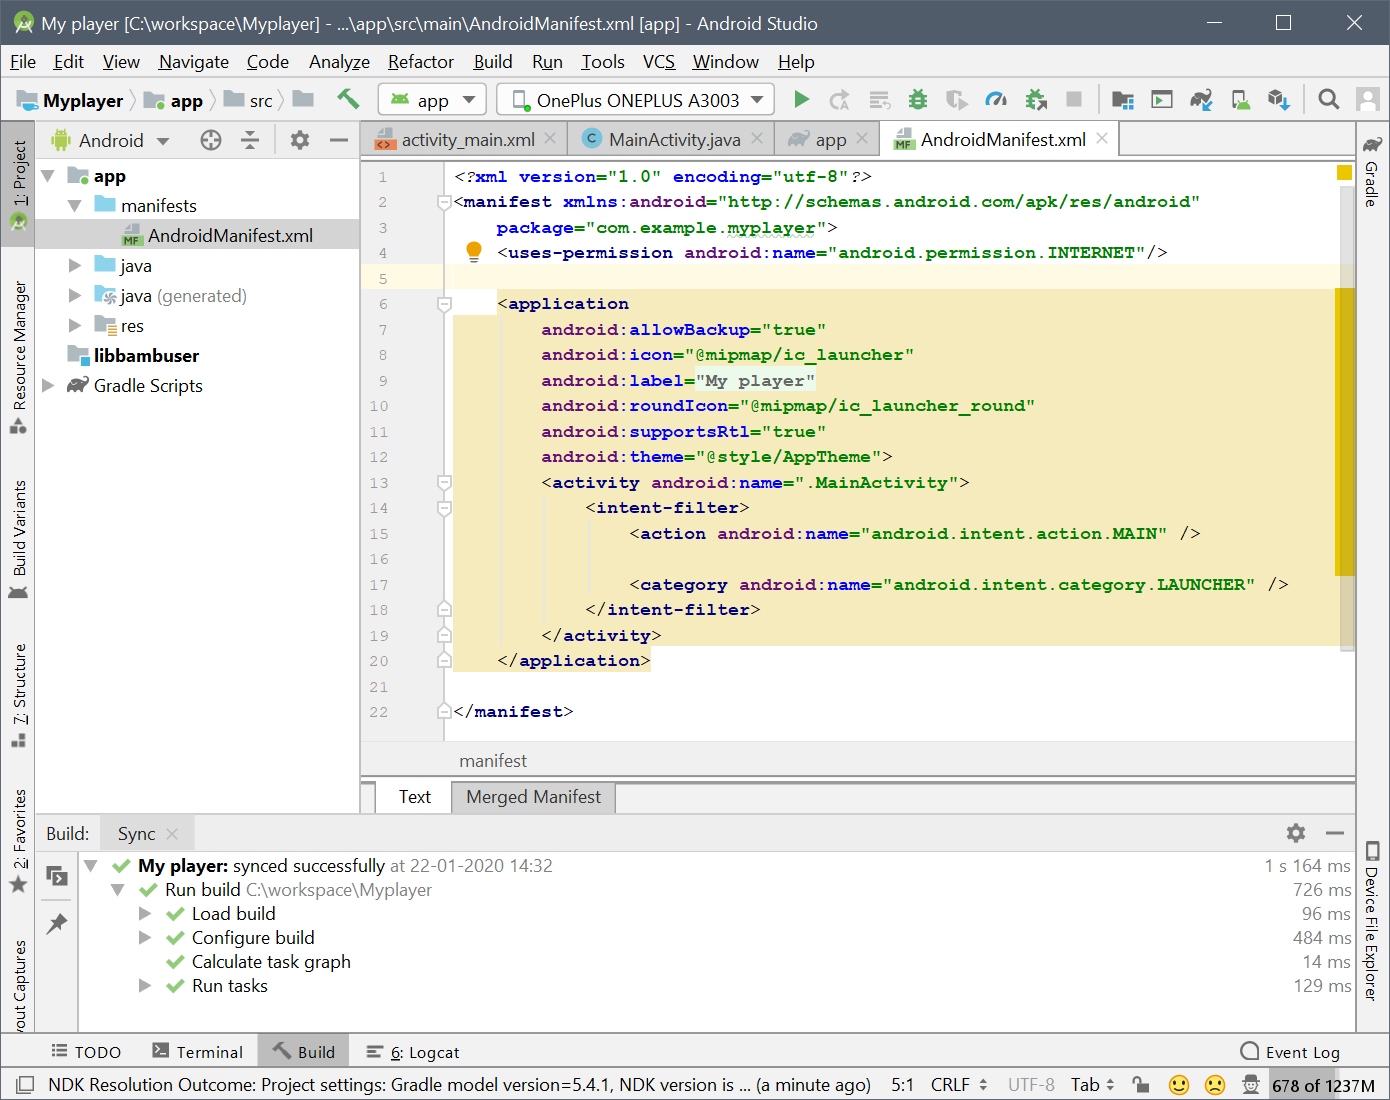
Add required Android app permissions
The Bambuser player for Android requires at least the INTERNET (opens new window) permission.
Open the
manifests/AndroidManifest.xmlfile in theProjecttree on the left.Add the permission tag before the
<application />tag:
<uses-permission android:name="android.permission.INTERNET"/>
Add a SurfaceView for video playback
In
activity_main.xmlreplace the auto-generatedTextViewwith a SurfaceViewWithAutoAR (opens new window) and aTextViewfor showing player state.Give the container layout a name such as
PlayerContentViewso we can grab a reference to it later.
<?xml version="1.0" encoding="utf-8"?>
<androidx.constraintlayout.widget.ConstraintLayout xmlns:android="http://schemas.android.com/apk/res/android"
    xmlns:app="http://schemas.android.com/apk/res-auto"
    xmlns:tools="http://schemas.android.com/tools"
    android:layout_width="match_parent"
    android:layout_height="match_parent"
    android:id="@+id/PlayerContentView"
    tools:context=".MainActivity">

    <com.bambuser.broadcaster.SurfaceViewWithAutoAR
        android:id="@+id/VideoSurfaceView"
        android:layout_width="wrap_content"
        android:layout_height="wrap_content"
        app:layout_constraintBottom_toBottomOf="parent"
        app:layout_constraintEnd_toEndOf="parent"
        app:layout_constraintStart_toStartOf="parent"
        app:layout_constraintTop_toTopOf="parent"/>
    <TextView
        android:id="@+id/PlayerStatusTextView"
        android:layout_width="wrap_content"
        android:layout_height="wrap_content"
        android:textColor="@color/colorAccent"
        android:textSize="20sp"
        app:layout_constraintBottom_toBottomOf="parent"
        app:layout_constraintEnd_toEndOf="parent"/>

</androidx.constraintlayout.widget.ConstraintLayout>
In the generated MainActivity.java import and add references to the
SurfaceViewWithAutoAR (opens new window)
and TextView from the layout.
import com.bambuser.broadcaster.SurfaceViewWithAutoAR;
import android.widget.TextView;
import android.view.View;
// ...

public class MainActivity extends AppCompatActivity {

    @Override
    protected void onCreate(Bundle savedInstanceState) {
        // ...
        mVideoSurface = findViewById(R.id.VideoSurfaceView);
        mPlayerStatusTextView = findViewById(R.id.PlayerStatusTextView);
        mPlayerContentView = findViewById(R.id.PlayerContentView);
    }

    SurfaceViewWithAutoAR mVideoSurface;
    TextView mPlayerStatusTextView;
    View mPlayerContentView;
}
Authentication
To access broadcasts, your app needs to identify itself to Bambuser. Head over to the Developer (opens new window) page on the Bambuser site and get the Sandbox applicationId which we'll use when constructing the BroadcastPlayer (opens new window).
To access the metadata API (opens new window), your app also needs an API key. Get an API key for your Sandbox environment from the Developer (opens new window) page on the Bambuser site.
Remember to replace the Sandbox id and key with a Production applicationId and a Production
API key before you release your app!
Preparations for playback
Prepare MainActivity.java for integration of the
BroadcastPlayer (opens new window) by
importing the related classes, adding an implementation of the
BroadcastPlayer.Observer (opens new window)
interface, and inserting your Sandbox applicationId and API key.
import com.bambuser.broadcaster.BroadcastPlayer;
import com.bambuser.broadcaster.PlayerState;
// ...
public class MainActivity extends AppCompatActivity {
    private static final String APPLICATION_ID = "PLEASE INSERT YOUR APPLICATION SPECIFIC ID PROVIDED BY BAMBUSER";
    private static final String API_KEY = "PLEASE INSERT AN API KEY PROVIDED BY BAMBUSER";
    // ...
    BroadcastPlayer.Observer mBroadcastPlayerObserver = new BroadcastPlayer.Observer() {
        @Override
        public void onStateChange(PlayerState playerState) {
            if (mPlayerStatusTextView != null)
                mPlayerStatusTextView.setText("Status: " + playerState);
        }
        @Override
        public void onBroadcastLoaded(boolean live, int width, int height) {
        }
    };
    // ...
}
Get resourceUri for latest broadcast
To demonstrate how the Bambuser metadata API (opens new window) can be used, we fetch information about the latest broadcasts in your Sandbox environment, and choose the latest one for playback.
Import classes needed for OkHttp and JSON parsing, initiate an asynchronous http request to
https://api.bambuser.com/broadcasts using your API key in the
onResume()
method, then parse the latest resourceUri from the results.
The network request must be enqueued on a background thread, while anything related to the UI must
be done on the main thread of the app.
Remember to cancel any outstanding http request and drop the reference to the SurfaceView in the onPause() method, to prevent a late response from causing playback in the background.
import org.json.JSONArray;
import org.json.JSONObject;
import java.io.IOException;
import okhttp3.Call;
import okhttp3.Callback;
import okhttp3.OkHttpClient;
import okhttp3.Request;
import okhttp3.Response;
// ...
public class MainActivity extends AppCompatActivity {
    // ...

    @Override
    protected void onPause() {
        super.onPause();
        mOkHttpClient.dispatcher().cancelAll();
        mVideoSurface = null;
    }

    @Override
    protected void onResume() {
        super.onResume();
        mVideoSurface = findViewById(R.id.VideoSurfaceView);
        mPlayerStatusTextView.setText("Loading latest broadcast");
        getLatestResourceUri();
    }

    void getLatestResourceUri() {
        Request request = new Request.Builder()
        .url("https://api.bambuser.com/broadcasts")
        .addHeader("Accept", "application/vnd.bambuser.v1+json")
        .addHeader("Content-Type", "application/json")
        .addHeader("Authorization", "Bearer " + API_KEY)
        .get()
        .build();
        mOkHttpClient.newCall(request).enqueue(new Callback() {
            @Override
            public void onFailure(final Call call, final IOException e) {
                runOnUiThread(new Runnable() { @Override public void run() {
                    if (mPlayerStatusTextView != null)
                        mPlayerStatusTextView.setText("Http exception: " + e);
                }});
            }
            @Override
            public void onResponse(final Call call, final Response response) throws IOException {
                String body = response.body().string();
                String resourceUri = null;
                try {
                    JSONObject json = new JSONObject(body);
                    JSONArray results = json.getJSONArray("results");
                    JSONObject latestBroadcast = results.optJSONObject(0);
                    resourceUri = latestBroadcast.optString("resourceUri");
                } catch (Exception ignored) {}
                final String uri = resourceUri;
                runOnUiThread(new Runnable() { @Override public void run() {
                    initPlayer(uri);
                }});
            }
        });
    }

    void initPlayer(String resourceUri) {
        if (resourceUri == null) {
            if (mPlayerStatusTextView != null)
                mPlayerStatusTextView.setText("Could not get info about latest broadcast");
            return;
        }
        if (mVideoSurface == null) {
            // UI no longer active
            return;
        }
    }
    // ...
    final OkHttpClient mOkHttpClient = new OkHttpClient();
}
Initiate a BroadcastPlayer
Import the BroadcastPlayer (opens new window)
class, create an instance of it in the initPlayer(resourceUri) method, using your
resourceUri,
applicationId,
SurfaceView (opens new window) and
BroadcastPlayer.Observer (opens new window).
Call load() (opens new window) to start loading the requested resourceUri.
Make sure to close the BroadcastPlayer when the Activity is no longer active.
import com.bambuser.broadcaster.BroadcastPlayer;
// ...
public class MainActivity extends AppCompatActivity {
    @Override
    protected void onPause() {
        // ...
        if (mBroadcastPlayer != null)
            mBroadcastPlayer.close();
        mBroadcastPlayer = null;
    }

    // ...
    void initPlayer(String resourceUri) {
        // ...
        if (mBroadcastPlayer != null)
            mBroadcastPlayer.close();
        mBroadcastPlayer = new BroadcastPlayer(this, resourceUri, APPLICATION_ID, mBroadcastPlayerObserver);
        mBroadcastPlayer.setSurfaceView(mVideoSurface);
        mBroadcastPlayer.load();
    }

    // ...
    BroadcastPlayer mBroadcastPlayer;
}
Sizing the video surface
By default, the SurfaceViewWithAutoAR (opens new window) will use crop to fill, avoiding black borders. However, if the video is an entirely different aspect ratio than the user's screen, crop to fill will crop more than desired. In this case, it's often better to use shrink to fit.
Import Display and add a reference to the properties.
Import Point and implement a method that gets the Display dimensions.
Compare the video and display aspect ratio when a broadcast is loaded and set the scaling mode according to your liking.
import android.graphics.Point;
import android.view.Display;
// ...
public class MainActivity extends AppCompatActivity {
    @Override
    protected void onCreate(Bundle savedInstanceState) {
        // ...
        mDefaultDisplay = getWindowManager().getDefaultDisplay();
    }

    private Point getScreenSize() {
        if (mDefaultDisplay == null)
            mDefaultDisplay = getWindowManager().getDefaultDisplay();
        Point size = new Point();
        try {
            // this is officially supported since SDK 17 and said to work down to SDK 14 through reflection,
            // so it might be everything we need.
            mDefaultDisplay.getClass().getMethod("getRealSize", Point.class).invoke(mDefaultDisplay, size);
        } catch (Exception e) {
            // fallback to approximate size.
            mDefaultDisplay.getSize(size);
        }
        return size;
    }

    BroadcastPlayer.Observer mBroadcastPlayerObserver = new BroadcastPlayer.Observer() {
        // ...
        @Override
        public void onBroadcastLoaded(boolean live, int width, int height) {
            Point size = getScreenSize();
            float screenAR = size.x / (float) size.y;
            float videoAR = width / (float) height;
            float arDiff = screenAR - videoAR;
            mVideoSurface.setCropToParent(Math.abs(arDiff) < 0.2);
        }
    };
    // ...
    Display mDefaultDisplay;
}
Running the app
The above should be enough for playback of the latest video. Connect your mobile device to your PC and follow the Android Developers guide for running your app (opens new window).
Provided that you have broadcast something to your Sandbox environment, the player should automatically find and play the latest broadcast.
Adding player controls
To use Android's standard
MediaController (opens new window)
widget, start by importing the class. Check the player state in the
onStateChange(playerState) (opens new window)
callback we added earlier. When an archived broadcast is successfully loaded, construct an
instance of the MediaController, attach it to the
BroadcastPlayer (opens new window)
and anchor it to mPlayerContentView.
Import the MotionEvent (opens new window)
class and show / hide the MediaController when the user taps the player.
import android.widget.MediaController;
import android.view.MotionEvent;
// ...
public class MainActivity extends AppCompatActivity {
    @Override
    protected void onPause() {
        // ...
        if (mMediaController != null)
            mMediaController.hide();
        mMediaController = null;
    }
    @Override
    public boolean onTouchEvent(MotionEvent ev) {
        if (ev.getActionMasked() == MotionEvent.ACTION_UP && mBroadcastPlayer != null && mMediaController != null) {
            PlayerState state = mBroadcastPlayer.getState();
            if (state == PlayerState.PLAYING ||
                state == PlayerState.BUFFERING ||
                state == PlayerState.PAUSED ||
                state == PlayerState.COMPLETED) {
                if (mMediaController.isShowing())
                    mMediaController.hide();
                else
                    mMediaController.show();
            } else {
                mMediaController.hide();
            }
        }
        return false;
    }
    // ...
    BroadcastPlayer.Observer mBroadcastPlayerObserver = new BroadcastPlayer.Observer() {
        @Override
        public void onStateChange(PlayerState playerState) {
            // ...
            if (playerState == PlayerState.PLAYING || playerState == PlayerState.PAUSED || playerState == PlayerState.COMPLETED) {
                if (mMediaController == null && mBroadcastPlayer != null && !mBroadcastPlayer.isTypeLive()) {
                    mMediaController = new MediaController(MainActivity.this);
                    mMediaController.setAnchorView(mPlayerContentView);
                    mMediaController.setMediaPlayer(mBroadcastPlayer);
                }
                if (mMediaController != null) {
                    mMediaController.setEnabled(true);
                    mMediaController.show();
                }
            } else if (playerState == PlayerState.ERROR || playerState == PlayerState.CLOSED) {
                if (mMediaController != null) {
                    mMediaController.setEnabled(false);
                    mMediaController.hide();
                }
                mMediaController = null;
            }
        }
        // ...
    };
    // ...
    MediaController mMediaController = null;
}
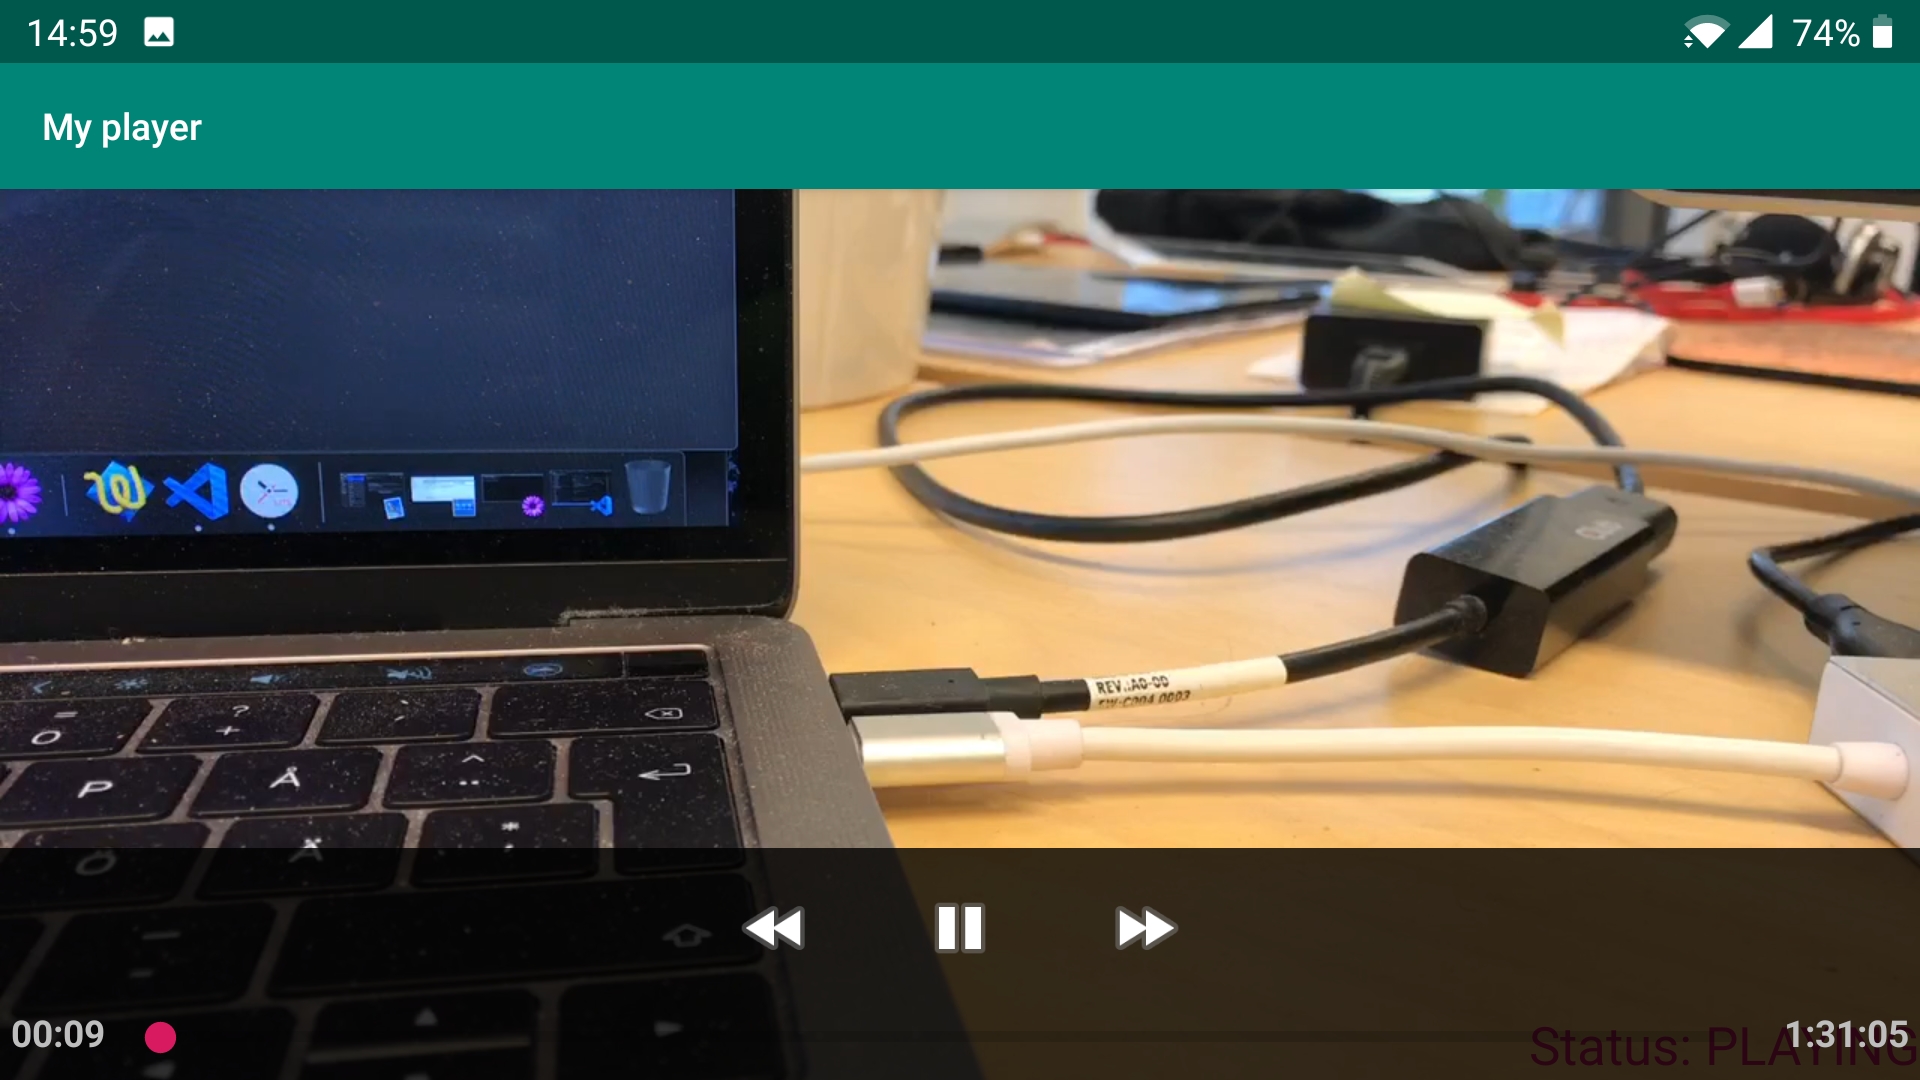
When playing an archived broadcast in the app, controls for pause, play and seeking should be available, as in the screenshot below.