⚠️ Sunset Notice: This service will be discontinued as of September 30th, 2023. Learn more »
Did you come here for Live Video Shopping?
This is documentation for Bambuser Live Streaming SDK.
If you're looking for documentation regarding Live Video Shopping (opens new window) , see these pages (opens new window)
How to create a live broadcasting app in Objective C using Xcode
This guide is based on Xcode 12.5.
This guide focuses on the bare minimum required to start broadcasting. Make sure to familiarize yourself with the example apps in the SDK bundles for a more complete overview.
Create a new Application
Open Xcode.
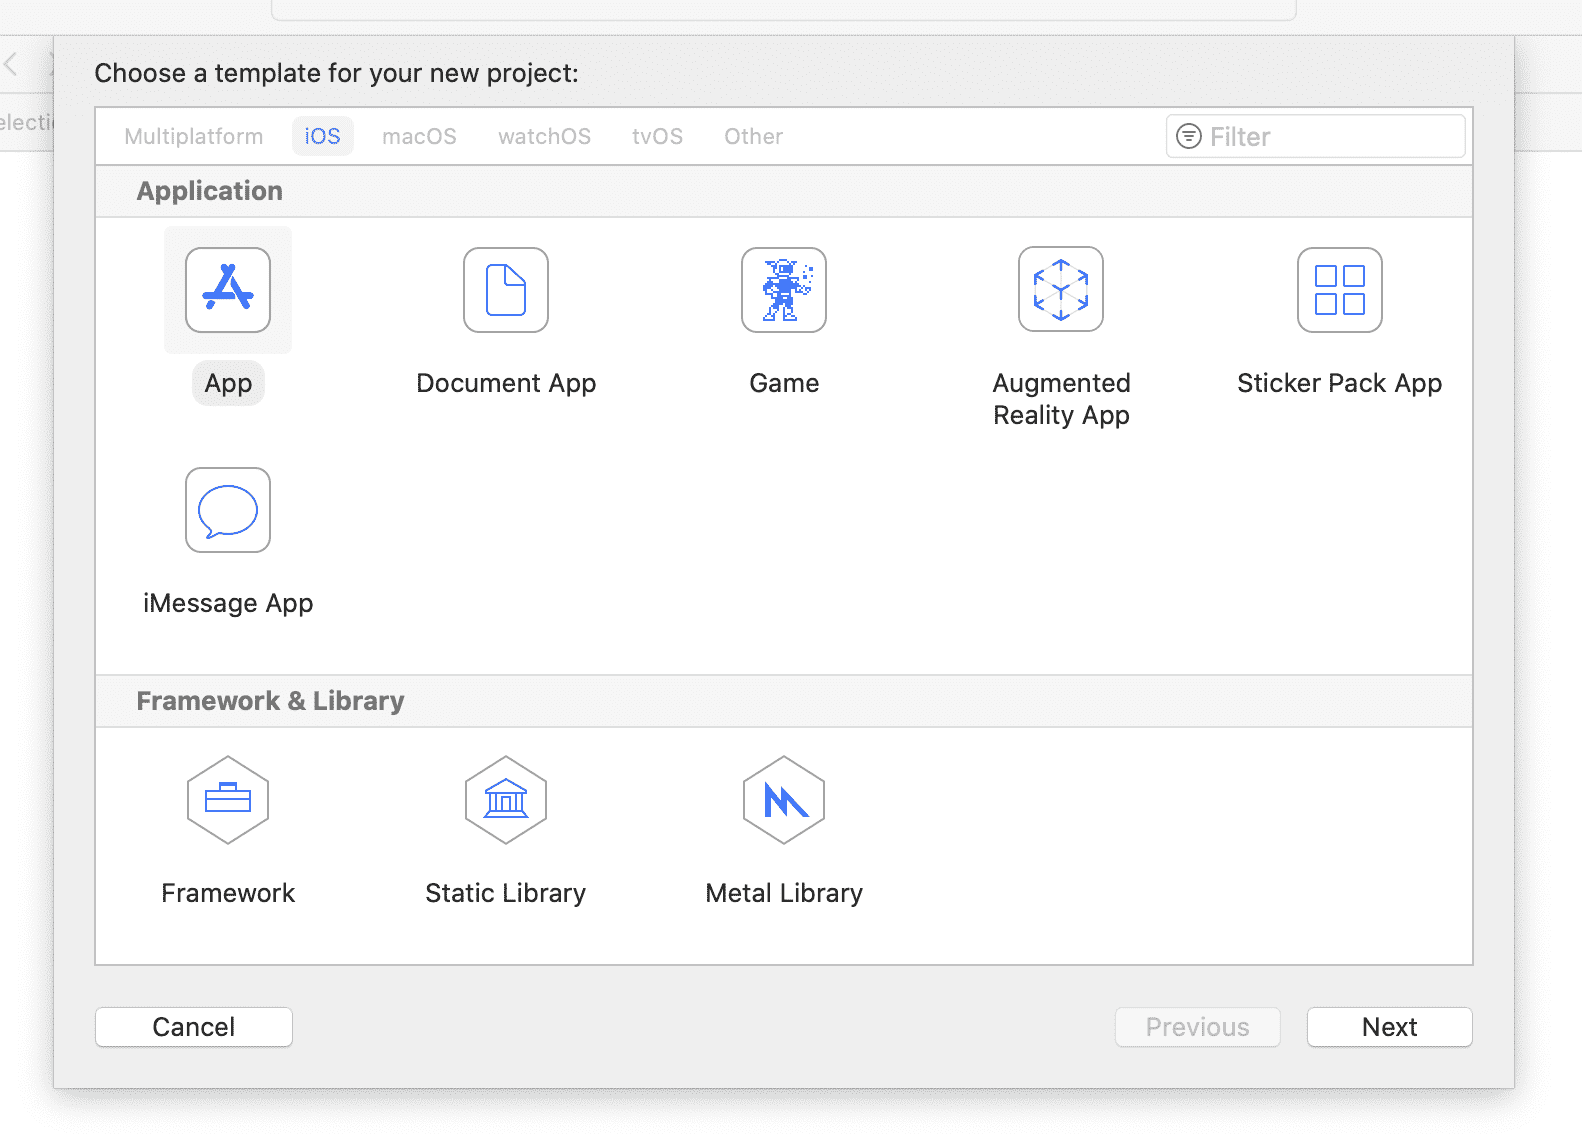
Select File -> New -> Project...
Choose the App template.
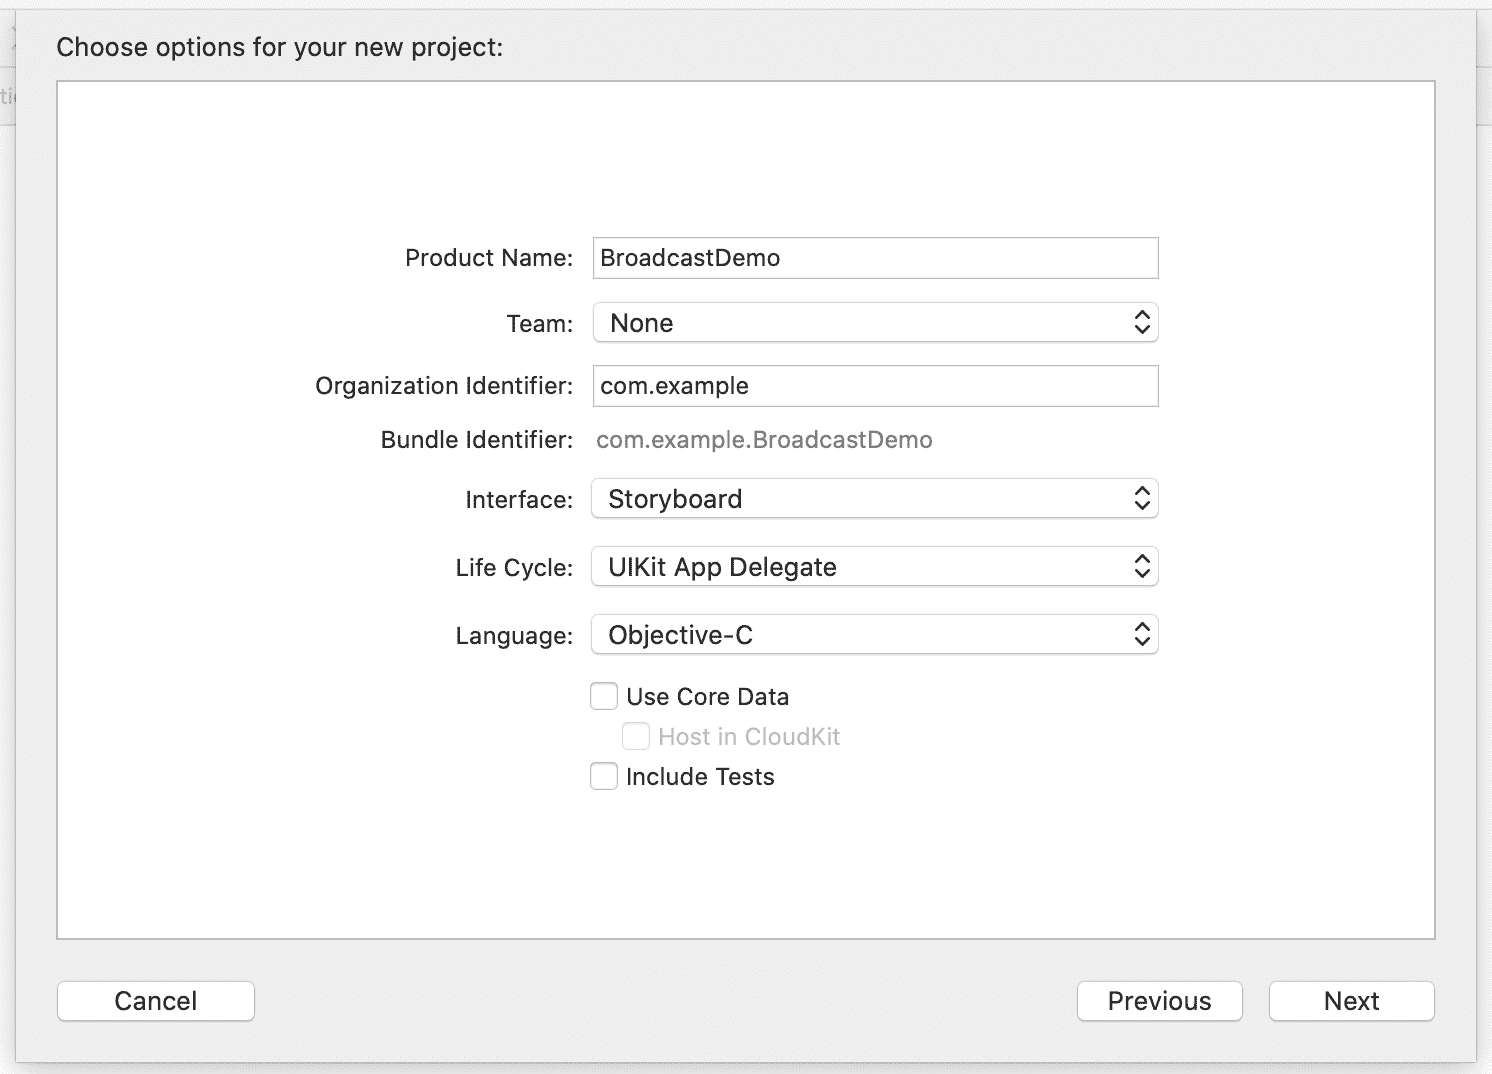
Enter a suitable product name and add your team and your organization identifier
Ensure Objective-C is the selected language. Or see the Swift guide if you prefer Swift.
Add dependencies
Install dependencies using CocoaPods
If your development environment is set up for it, you can use CocoaPods (opens new window) to install the Bambuser SDK:s.
Prepare the newly created project for CocoaPods use with
pod init.Add
pod 'libbambuser-ios', '1.0.4'to your Podfile.Run
pod installto fetch the SDK and configure the project.
Install dependencies manually
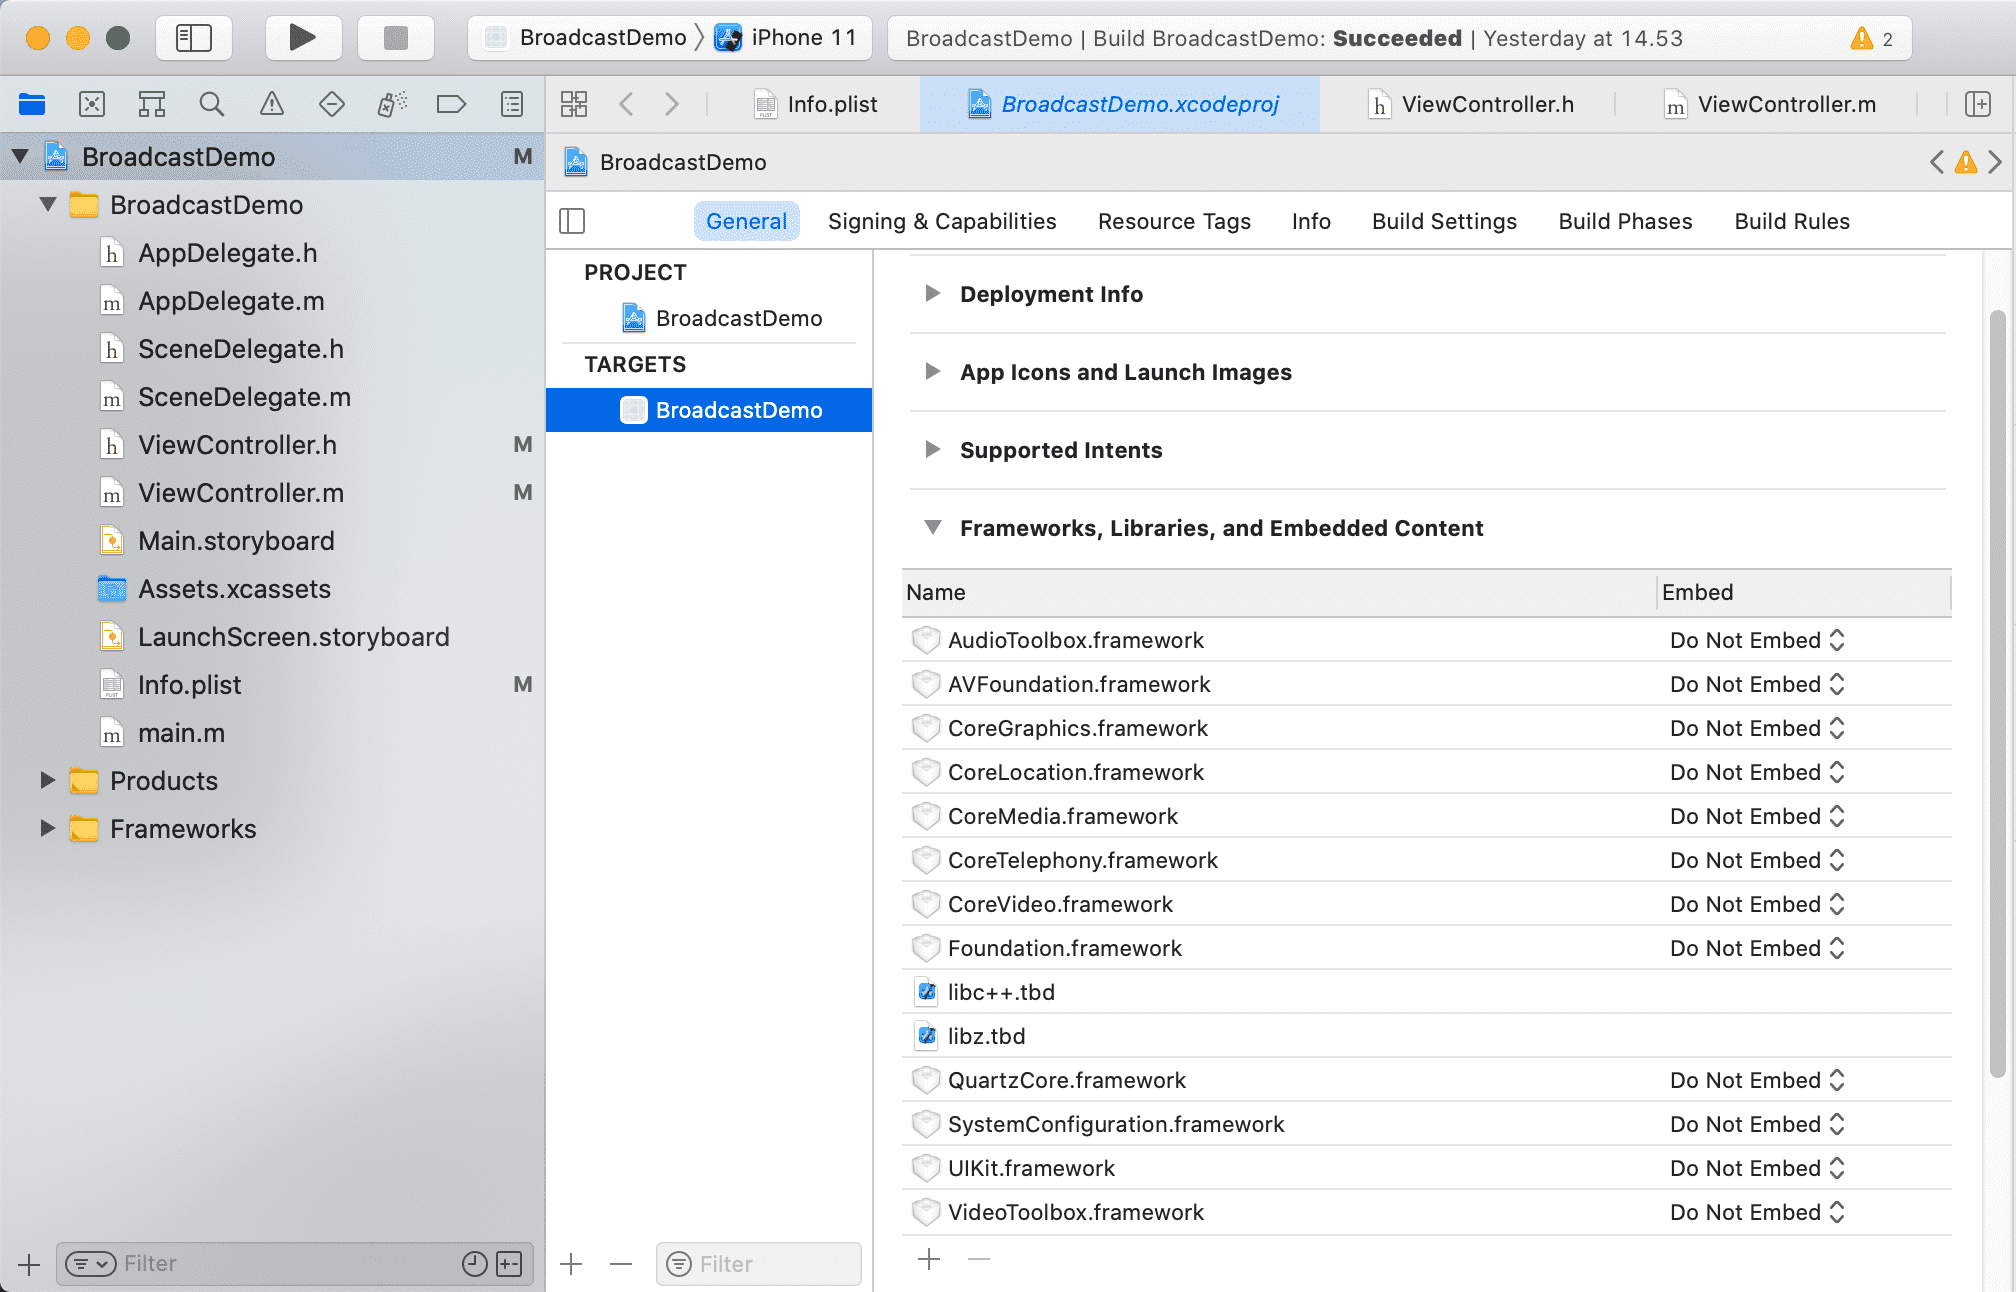
The Bambuser broadcasting library has the following dependencies:
libz.tbd,libc++.tbdAudioToolbox,AVFoundation,CoreGraphics,CoreLocation,CoreMedia,CoreTelephony,CoreVideo,Foundation,QuartzCore,SystemConfiguration,UIKit,VideoToolbox
Add the broadcast SDK
Log in to the Bambuser site and download the latest iOS SDK bundle from the Developer (opens new window) page.
Open up Finder and navigate to the download folder, then double click the SDK bundle to unzip it.
Go to the
Frameworksdirectory in the SDK bundle and dragBambuserBroadcaster.xcframeworkinto the Frameworks section of your Xcode project's file tree navigator.
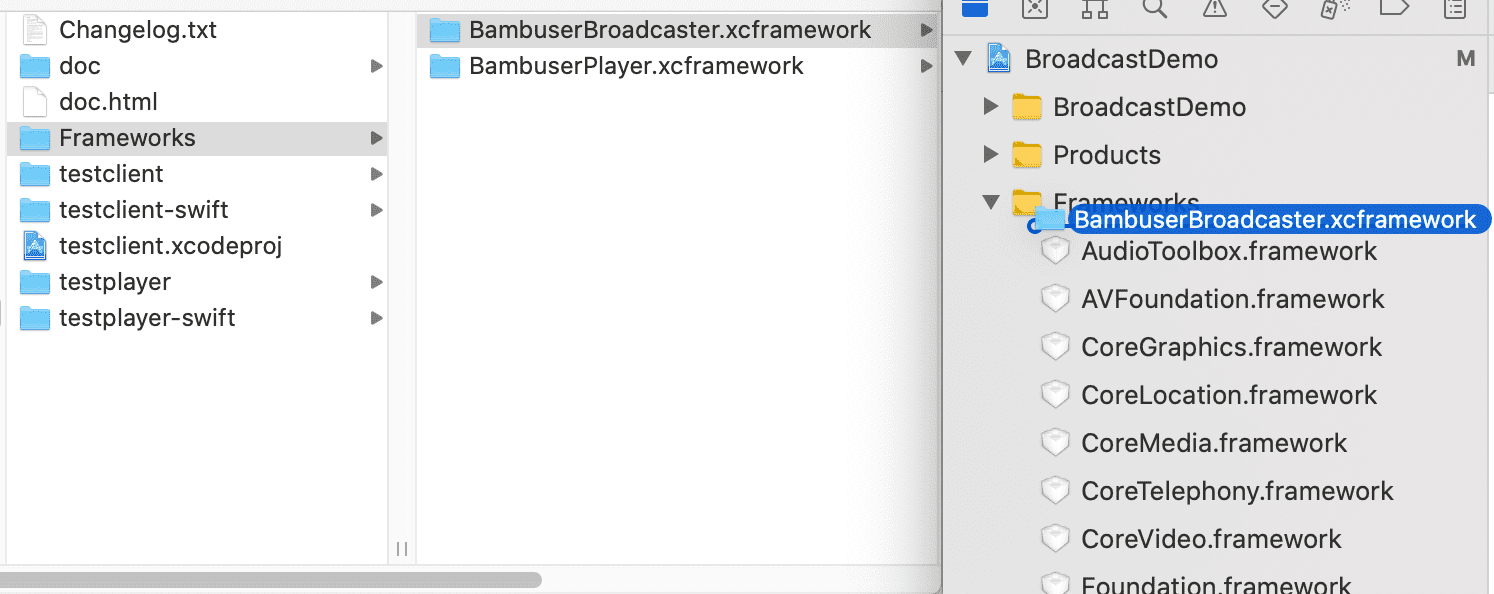
- Check Copy items if needed to ensure that your project folder gets its own copy of the files.
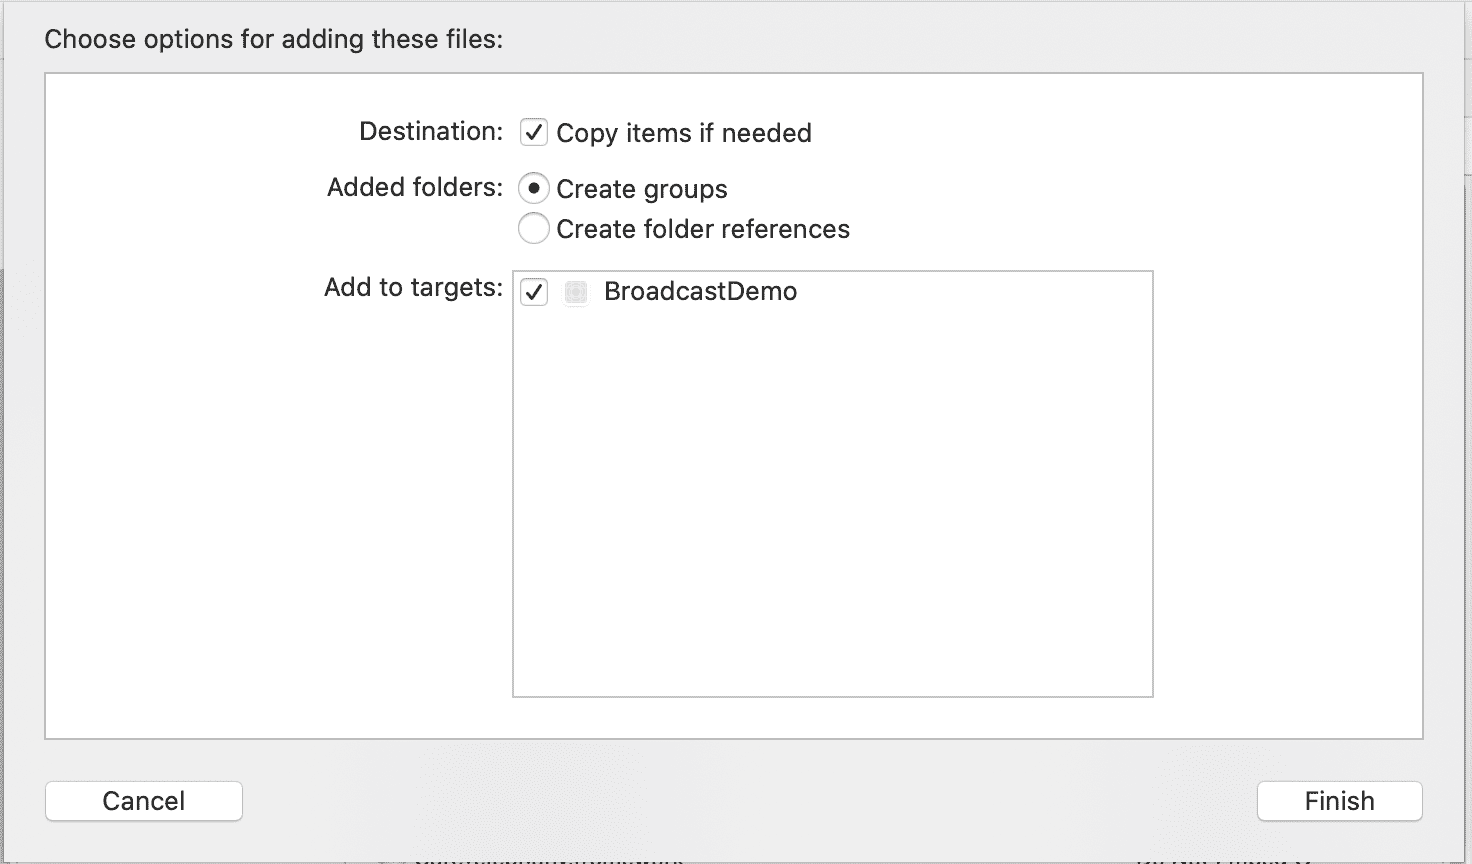
- The act of adding
BambuserBroadcaster.xcframeworkinto Frameworks should also have addedBambuserBroadcaster.xcframeworkto Frameworks, Libraries and Embedded Content under General.
Enable camera and microphone access
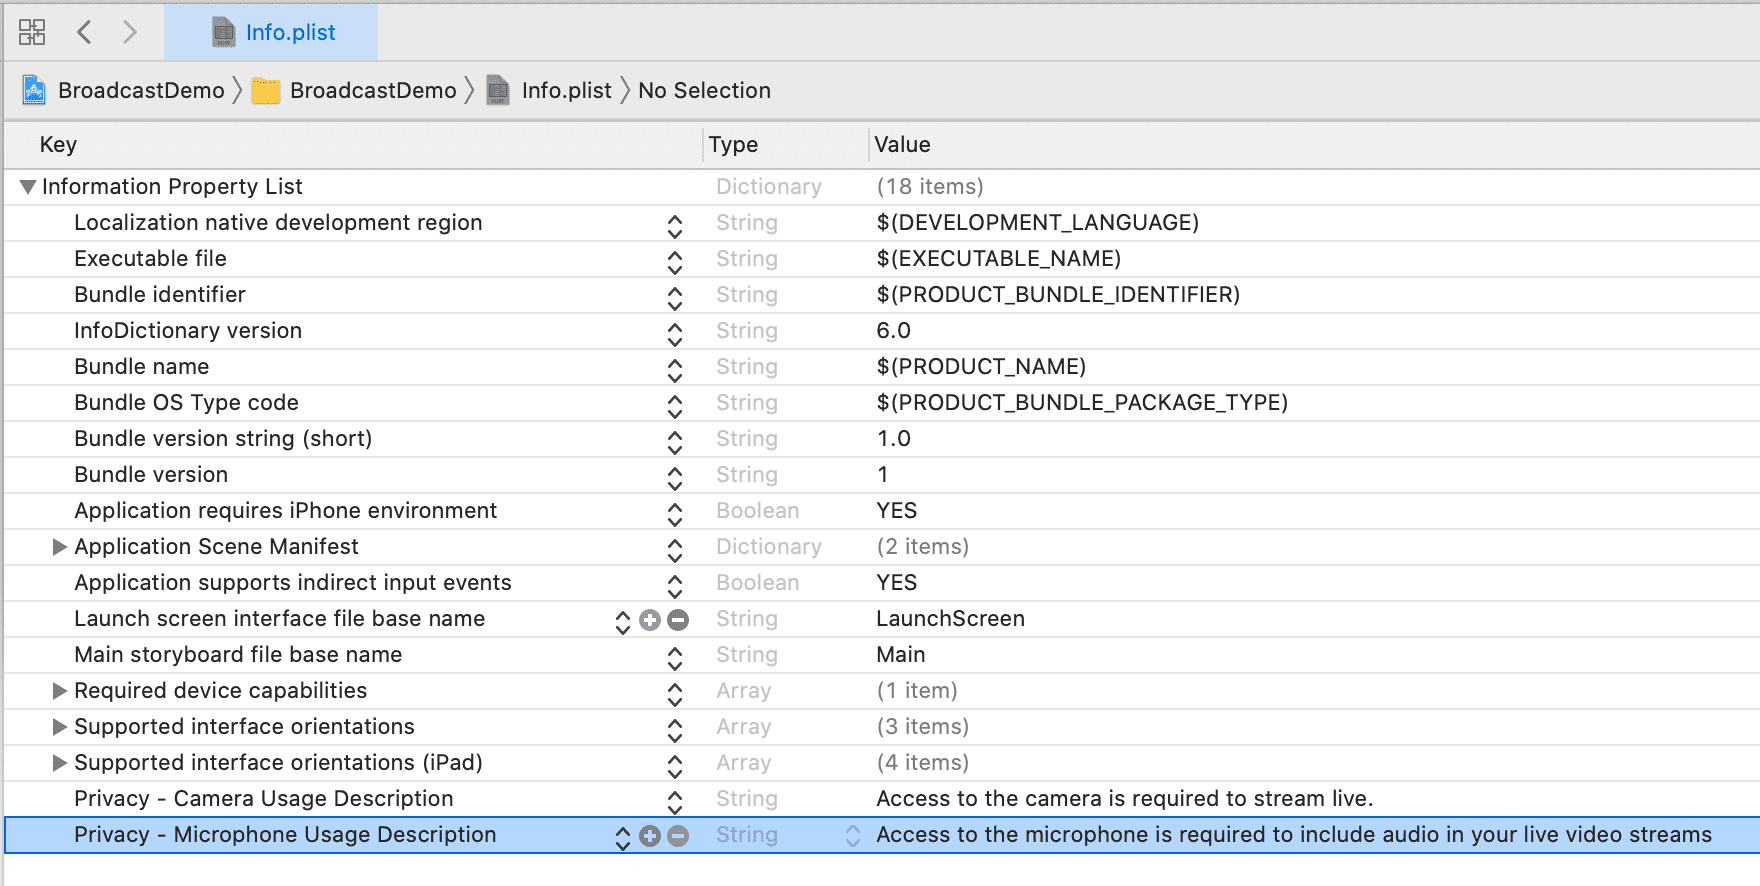
Your app will not be allowed to access the camera or microphone unless its
Info.plist file contains entries for Privacy - Camera Usage Description
and Privacy - Microphone Usage Description.
Double-click Info.plist to bring up the editor and add them to the bottom
of the list.
Bootstrap the SDK
Now that you have installed the dependencies it's time to start using the SDK.
In ViewController.h import BambuserBroadcaster/BambuserBroadcaster.h and add BambuserView (opens new window)
to the interface.
#import <UIKit/UIKit.h>
#import <BambuserBroadcaster/BambuserBroadcaster.h>

@interface ViewController : UIViewController {
	BambuserView *bambuserView;
}

@end
In ViewController.m extend the viewDidLoad method to create an instance of
BambuserView (opens new window) when the viewcontroller is loaded.
BambuserView (opens new window) requires a preset, kSessionPresetAuto is optimal for most apps.
- (void) viewDidLoad {
	[super viewDidLoad];

	bambuserView = [[BambuserView alloc] initWithPreparePreset: kSessionPresetAuto];
}
Add the viewfinder
In ViewController.m in the viewDidLoad method, add the viewfinder
to the view hierarchy and ensure it is rotated correctly.
[bambuserView setOrientation: [UIApplication sharedApplication].statusBarOrientation];
[self.view addSubview:bambuserView.view];
In ViewController.m add a viewWillLayoutSubviews method, then add some code
to ensure the viewfinder is assigned the desired dimensions.
- (void) viewWillLayoutSubviews {
	float statusBarOffset = self.topLayoutGuide.length;
	[bambuserView setPreviewFrame: CGRectMake(0, 0 + statusBarOffset, self.view.bounds.size.width, self.view.bounds.size.height - statusBarOffset)];
}
Start capturing frames
After all settings to BambuserView has been done, add a call to to startCapture
in the viewDidLoad method.
[bambuserView startCapture];
Authentication
To be able to broadcast, your app needs to identify itself to Bambuser.
Head over to the Developer (opens new window) page on the
Bambuser site again and get the Sandbox applicationId,
then assign it to BambuserView (opens new window) in ViewController.m directly after initialization.
WARNING
Remember to replace the Sandbox id with a Production applicationId before you release your app!
bambuserView.applicationId = @"GFZalqkR5iyZcIgaolQmA";
Add a broadcasting button
Let's add a simple button to be able to control the broadcast start and stop triggers.
In ViewController.h, declare a button:
@interface ViewController : UIViewController {
	BambuserView *bambuserView;
	UIButton *broadcastButton;
}
In ViewController.m, in the viewDidLoad method, initialize the button
and add it to the view hierarchy:
broadcastButton = [UIButton buttonWithType: UIButtonTypeSystem];
[broadcastButton addTarget:self action:@selector(broadcast) forControlEvents:UIControlEventTouchUpInside];
[broadcastButton setTitle:@"Broadcast" forState: UIControlStateNormal];
[self.view addSubview:broadcastButton];
In ViewController.m, in the viewWillLayoutSubviews method, position
the button to taste
broadcastButton.frame = CGRectMake(20, 20 + statusBarOffset, 100, 40);
Also add a new method to handle button taps
- (void) broadcast {
	NSLog(@"Starting broadcast");
	[broadcastButton setTitle:@"Connecting" forState:UIControlStateNormal];
	[broadcastButton removeTarget:nil action:NULL forControlEvents:UIControlEventTouchUpInside];
	[broadcastButton addTarget:bambuserView action:@selector(stopBroadcasting) forControlEvents:UIControlEventTouchUpInside];
	[bambuserView startBroadcasting];
}
Subscribe to events
To know what's going on inside BambuserView (opens new window), we should hook up ourself as
its delegate. In ViewController.m, assign self to bambuserView.delegate
directly after initialization:
bambuserView.delegate = self;
In ViewController.h, we now need to declare that we support the
BambuserViewDelegate (opens new window) protocol:
@interface ViewController : UIViewController <BambuserViewDelegate> {
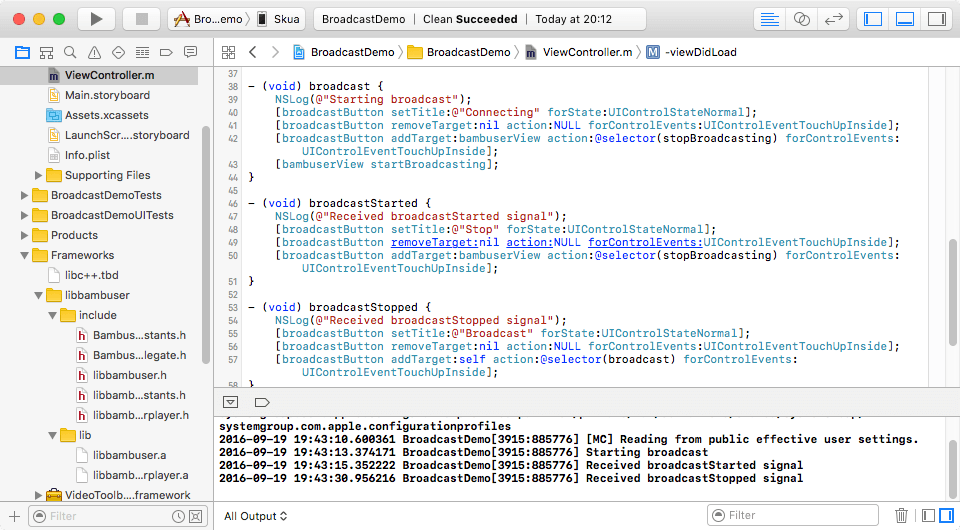
Finally, we add a few callback methods in ViewController.m:
- (void) broadcastStarted {
	NSLog(@"Received broadcastStarted signal");
	[broadcastButton setTitle:@"Stop" forState:UIControlStateNormal];
	[broadcastButton removeTarget:nil action:NULL forControlEvents:UIControlEventTouchUpInside];
	[broadcastButton addTarget:bambuserView action:@selector(stopBroadcasting) forControlEvents:UIControlEventTouchUpInside];
}

- (void) broadcastStopped {
	NSLog(@"Received broadcastStopped signal");
	[broadcastButton setTitle:@"Broadcast" forState:UIControlStateNormal];
	[broadcastButton removeTarget:nil action:NULL forControlEvents:UIControlEventTouchUpInside];
	[broadcastButton addTarget:self action:@selector(broadcast) forControlEvents:UIControlEventTouchUpInside];
}
Configuring AVAudioSession
Since iOS 14.5 there is an option to prevent the system from interrupting the audio session at an incoming
call notification (and thereby interrupting the broadcast), by setting [[AVAudioSession sharedInstance] setPrefersNoInterruptionsFromSystemAlerts: error:] to YES.
Note! This is only effective if the user has selected Banner notification display style (Settings - Phone - Incoming calls).
Putting it all together
The above steps should lead to a main view source somewhat along these lines:
ViewController.h
#import <UIKit/UIKit.h>
#import <BambuserBroadcaster/BambuserBroadcaster.h>

@interface ViewController : UIViewController <BambuserViewDelegate> {
	BambuserView *bambuserView;
	UIButton *broadcastButton;
}

@end
ViewController.m
#import "ViewController.h"

@interface ViewController ()

@end

@implementation ViewController

- (void)viewDidLoad {
	[super viewDidLoad];

	if (@available(iOS 14.5, *)) {
		[[AVAudioSession sharedInstance] setPrefersNoInterruptionsFromSystemAlerts: YES error: nil];
	}

	bambuserView = [[BambuserView alloc] initWithPreparePreset: kSessionPresetAuto];
	bambuserView.delegate = self;
	bambuserView.applicationId = @"GFZalqkR5iyZcIgaolQmA";
	[bambuserView setOrientation: [UIApplication sharedApplication].statusBarOrientation];
	[self.view addSubview:bambuserView.view];
	[bambuserView startCapture];

	broadcastButton = [UIButton buttonWithType: UIButtonTypeSystem];
	[broadcastButton addTarget:self action:@selector(broadcast) forControlEvents:UIControlEventTouchUpInside];
	[broadcastButton setTitle:@"Broadcast" forState: UIControlStateNormal];
	[self.view addSubview:broadcastButton];
}

- (void) viewWillLayoutSubviews {
	float statusBarOffset = self.topLayoutGuide.length;
	[bambuserView setPreviewFrame: CGRectMake(0, 0 + statusBarOffset, self.view.bounds.size.width, self.view.bounds.size.height - statusBarOffset)];
	broadcastButton.frame = CGRectMake(20, 20 + statusBarOffset, 100, 40);
}

- (void) broadcast {
	NSLog(@"Starting broadcast");
	[broadcastButton setTitle:@"Connecting" forState:UIControlStateNormal];
	[broadcastButton removeTarget:nil action:NULL forControlEvents:UIControlEventTouchUpInside];
	[broadcastButton addTarget:bambuserView action:@selector(stopBroadcasting) forControlEvents:UIControlEventTouchUpInside];
	[bambuserView startBroadcasting];
}

- (void) broadcastStarted {
	NSLog(@"Received broadcastStarted signal");
	[broadcastButton setTitle:@"Stop" forState:UIControlStateNormal];
	[broadcastButton removeTarget:nil action:NULL forControlEvents:UIControlEventTouchUpInside];
	[broadcastButton addTarget:bambuserView action:@selector(stopBroadcasting) forControlEvents:UIControlEventTouchUpInside];
}

- (void) broadcastStopped {
	NSLog(@"Received broadcastStopped signal");
	[broadcastButton setTitle:@"Broadcast" forState:UIControlStateNormal];
	[broadcastButton removeTarget:nil action:NULL forControlEvents:UIControlEventTouchUpInside];
	[broadcastButton addTarget:self action:@selector(broadcast) forControlEvents:UIControlEventTouchUpInside];
}

- (void)didReceiveMemoryWarning {
	[super didReceiveMemoryWarning];
	// Dispose of any resources that can be recreated.
}

@end
Testing in the simulator
Since the iOS Simulator does not feature a camera, what you can do there is limited.
Testing on a device
How to configure Xcode for ad-hoc development is out of scope for this guide. Assuming you have all the required privileges, you should be able to tether your iOS device to Xcode and click run.
If everything is set up correctly, you should be able to start your first broadcast by tapping the button we added earlier.
Check the Bambuser site when logged in for a notification and web preview when you go live in Sandbox mode.
This is how it looks on the phone
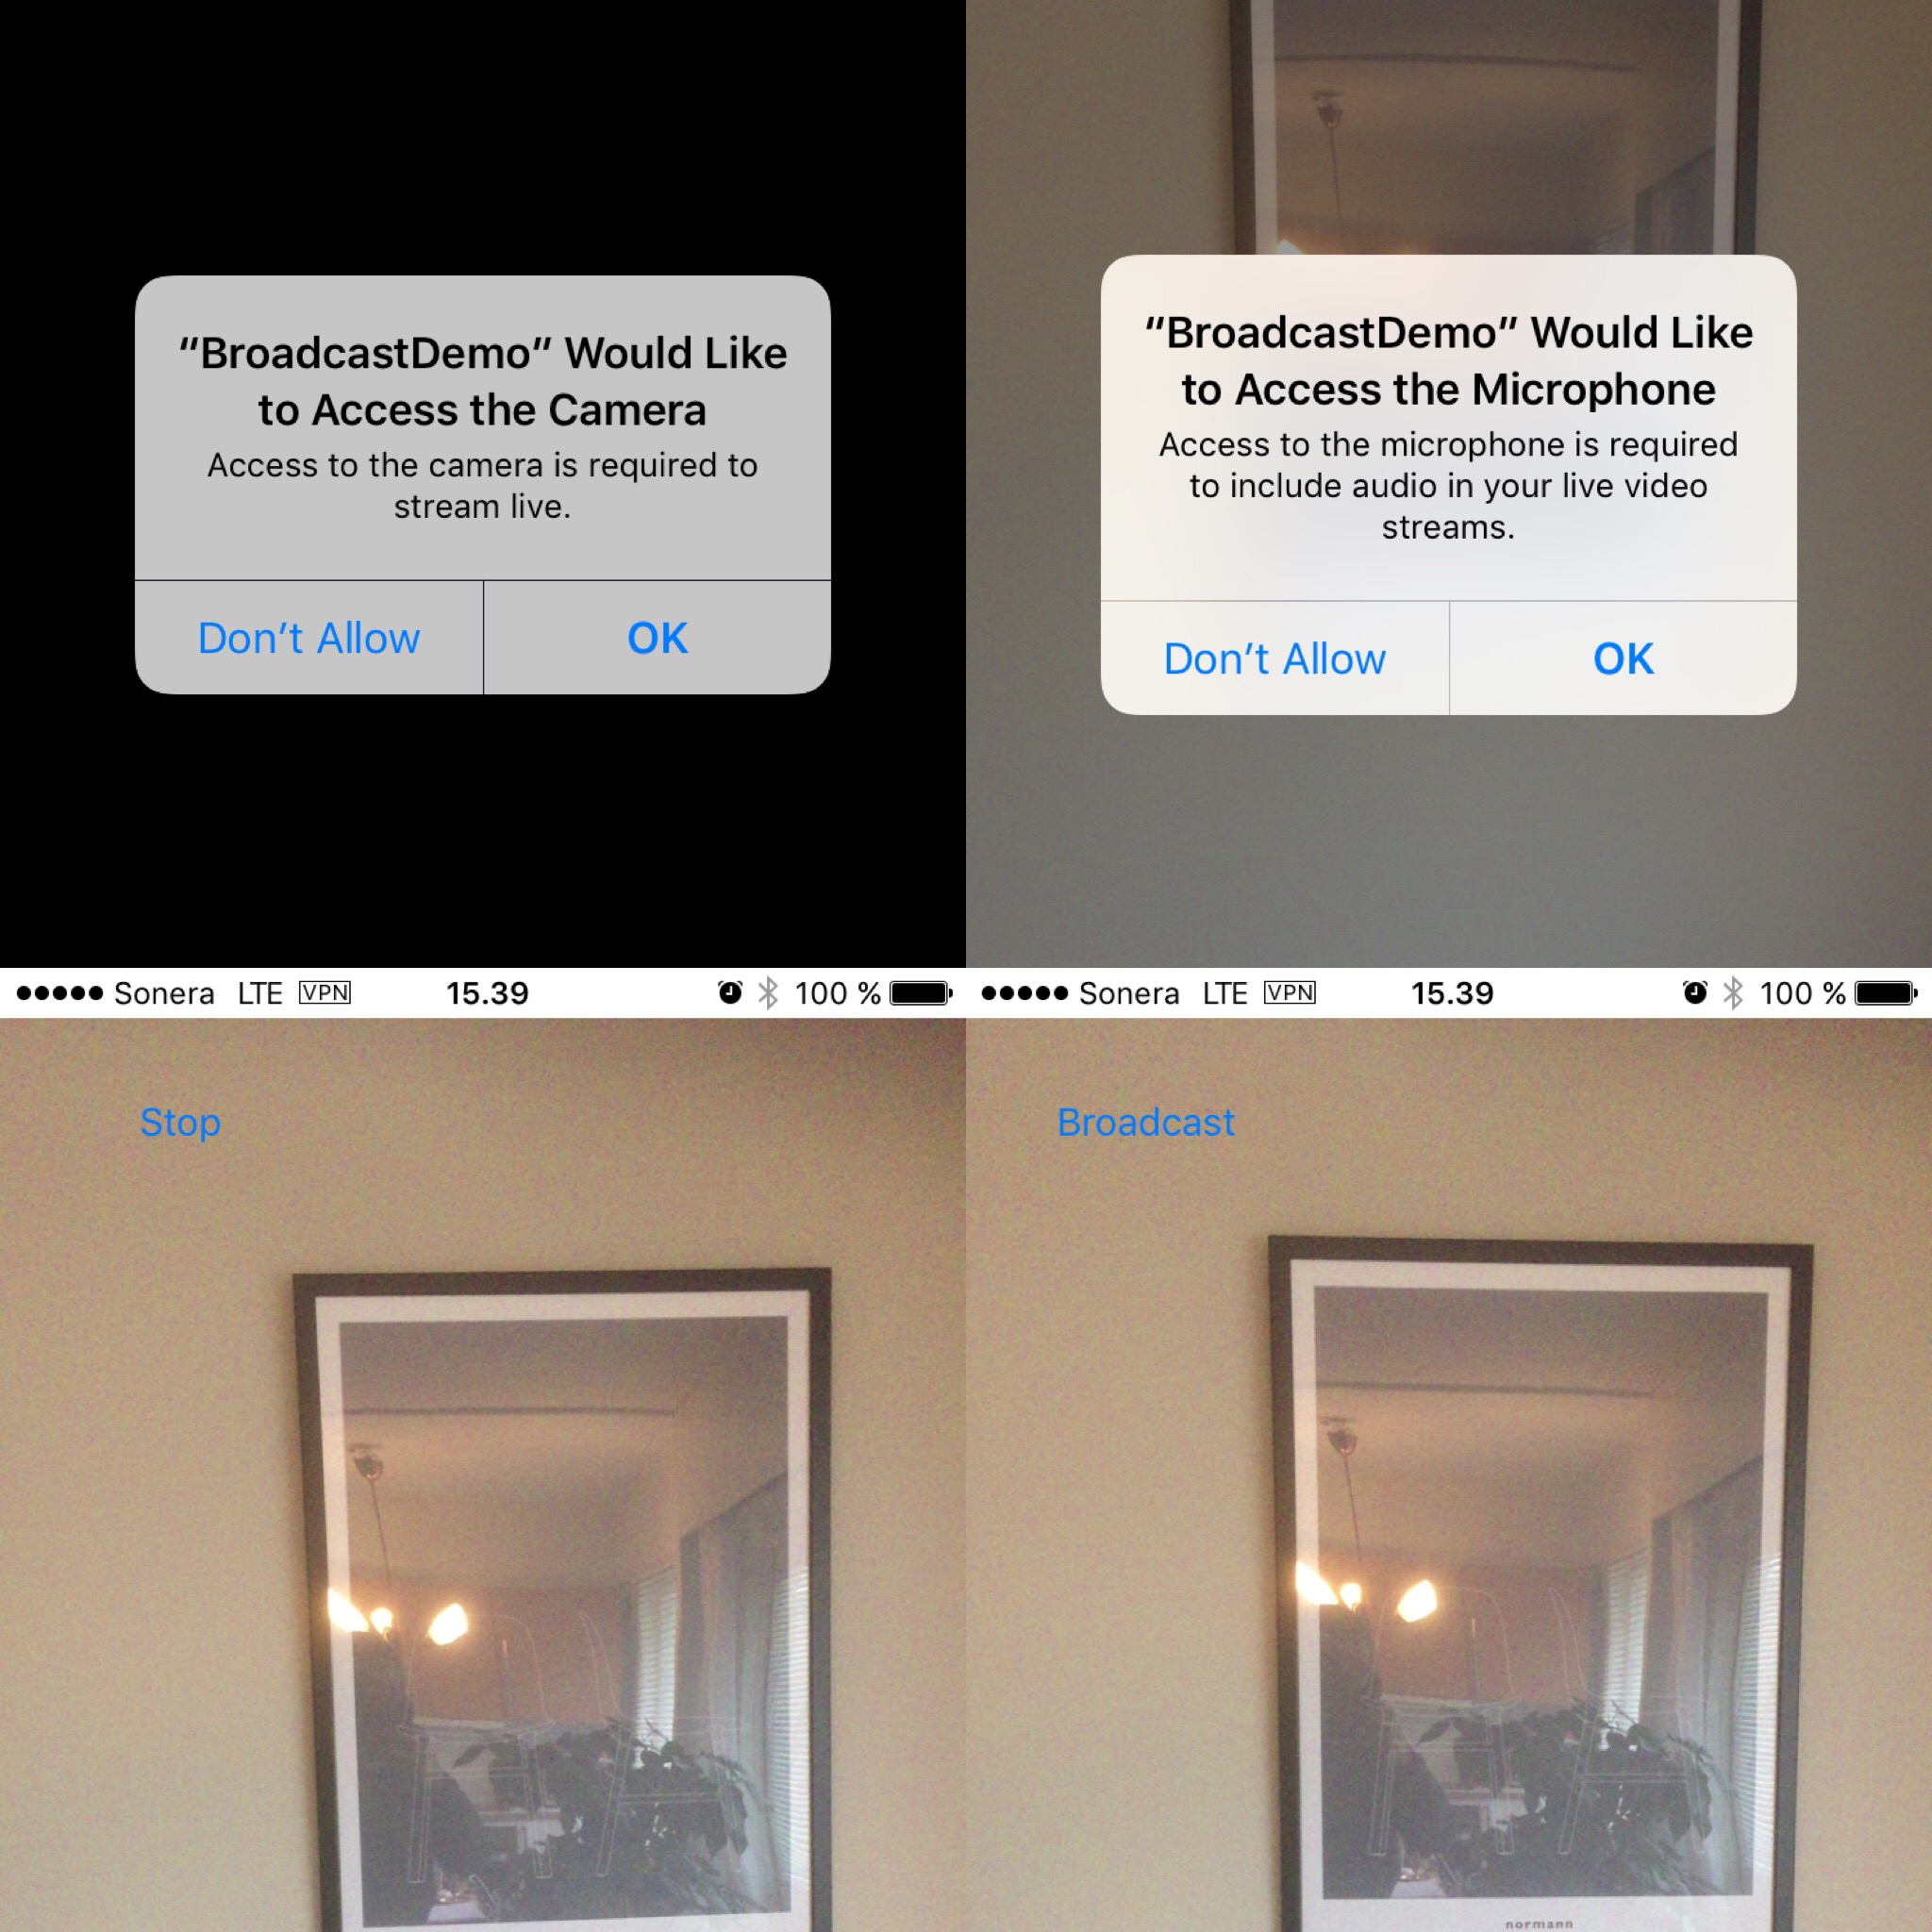
Tap the button to start a broadcast.
Screenshot 1-2: The first time, iOS asks the user for camera and microphone access.
Screenshot 3: Then the broadcast is running and the button turns into a stop button.
Screnshot 4: Finally, we tap the button again and return to the non-broadcasting state.
What's next
Be sure to experience a few of your live broadcasts via the Sandbox player on the Bambuser website.
Consider whether you also need a player in your app and / or on your website.
Study the REST APIs (opens new window) and Webhooks, which can be used to make your backend broadcast-aware.