⚠️ Sunset Notice: This service will be discontinued as of September 30th, 2023. Learn more »
Did you come here for Live Video Shopping?
This is documentation for Bambuser Live Streaming SDK.
If you're looking for documentation regarding Live Video Shopping (opens new window) , see these pages (opens new window)
How to create a live video playback app in Objective C using XCode
This guide is based on Xcode 12.2.
This guide focuses on the bare minimum required to play broadcasts. Make sure to familiarize yourself with the example apps in the SDK bundles for a more complete overview.
Choose your environment:
Xcode and Objective C
Open Xcode.
Select
File -> New -> Project...Choose the
Apptemplate.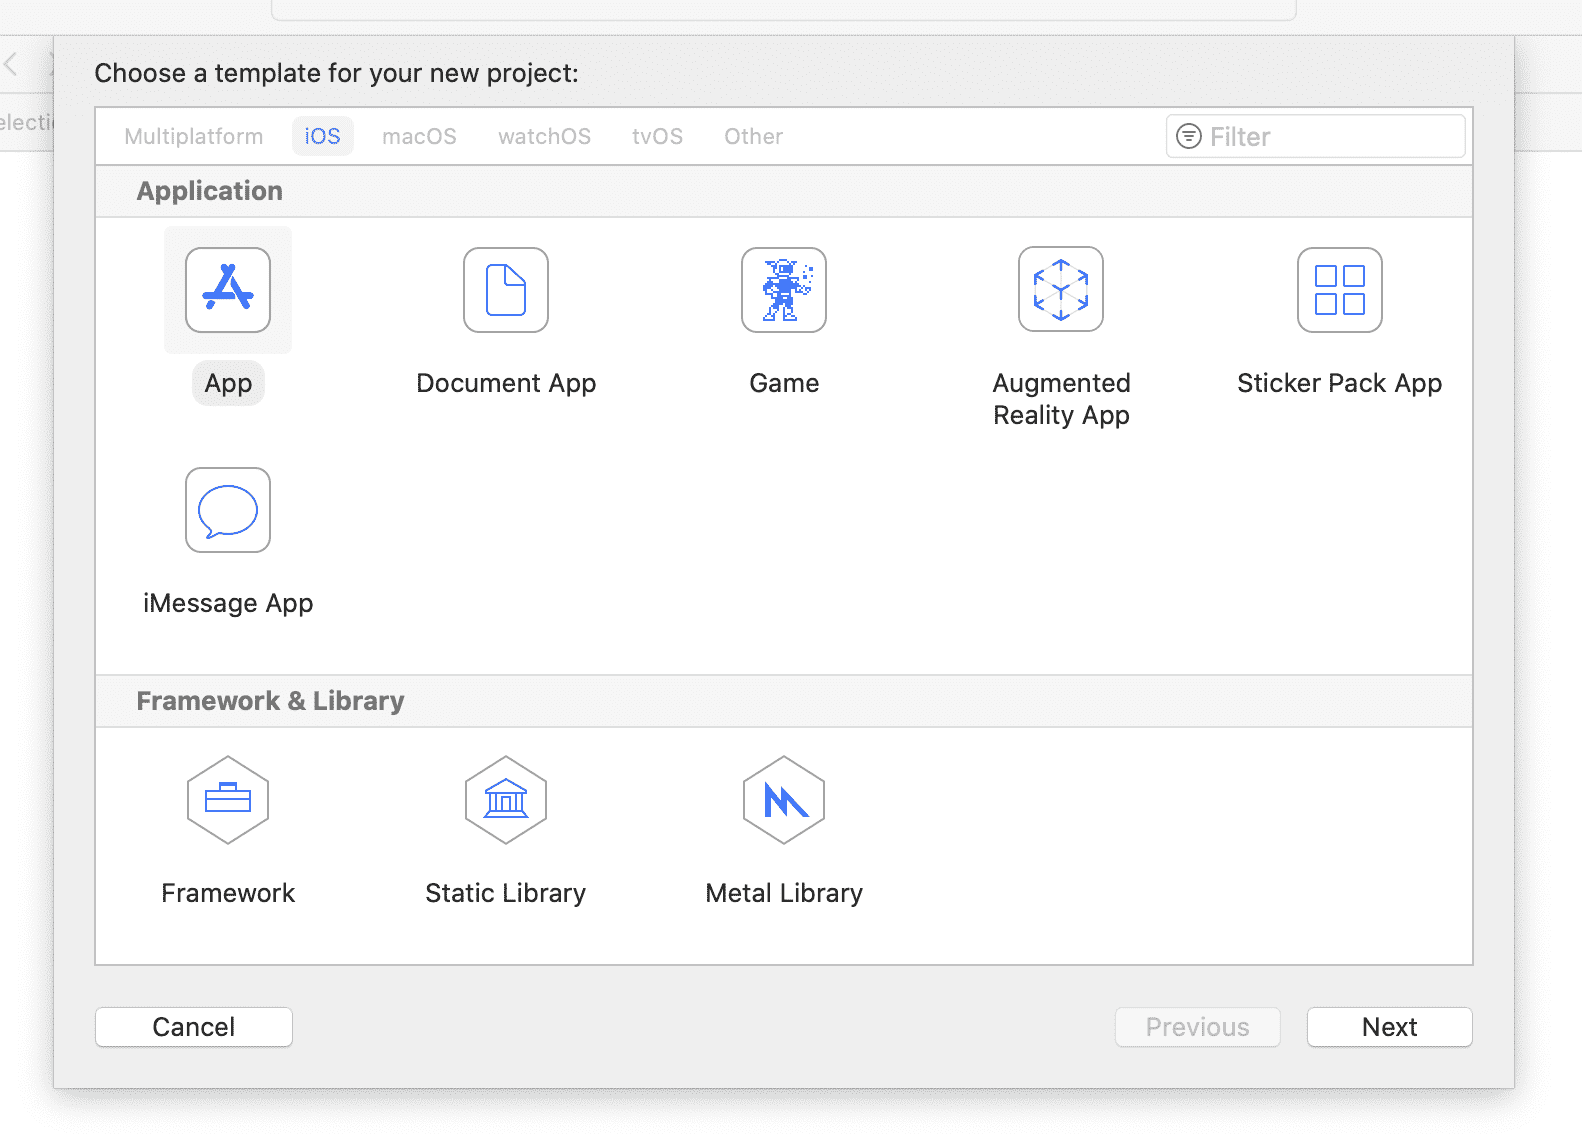
Enter a suitable product name and add your team and your organization identifier
Ensure
Objective-Cis the selected language. Or see the Swift guide if you prefer Swift.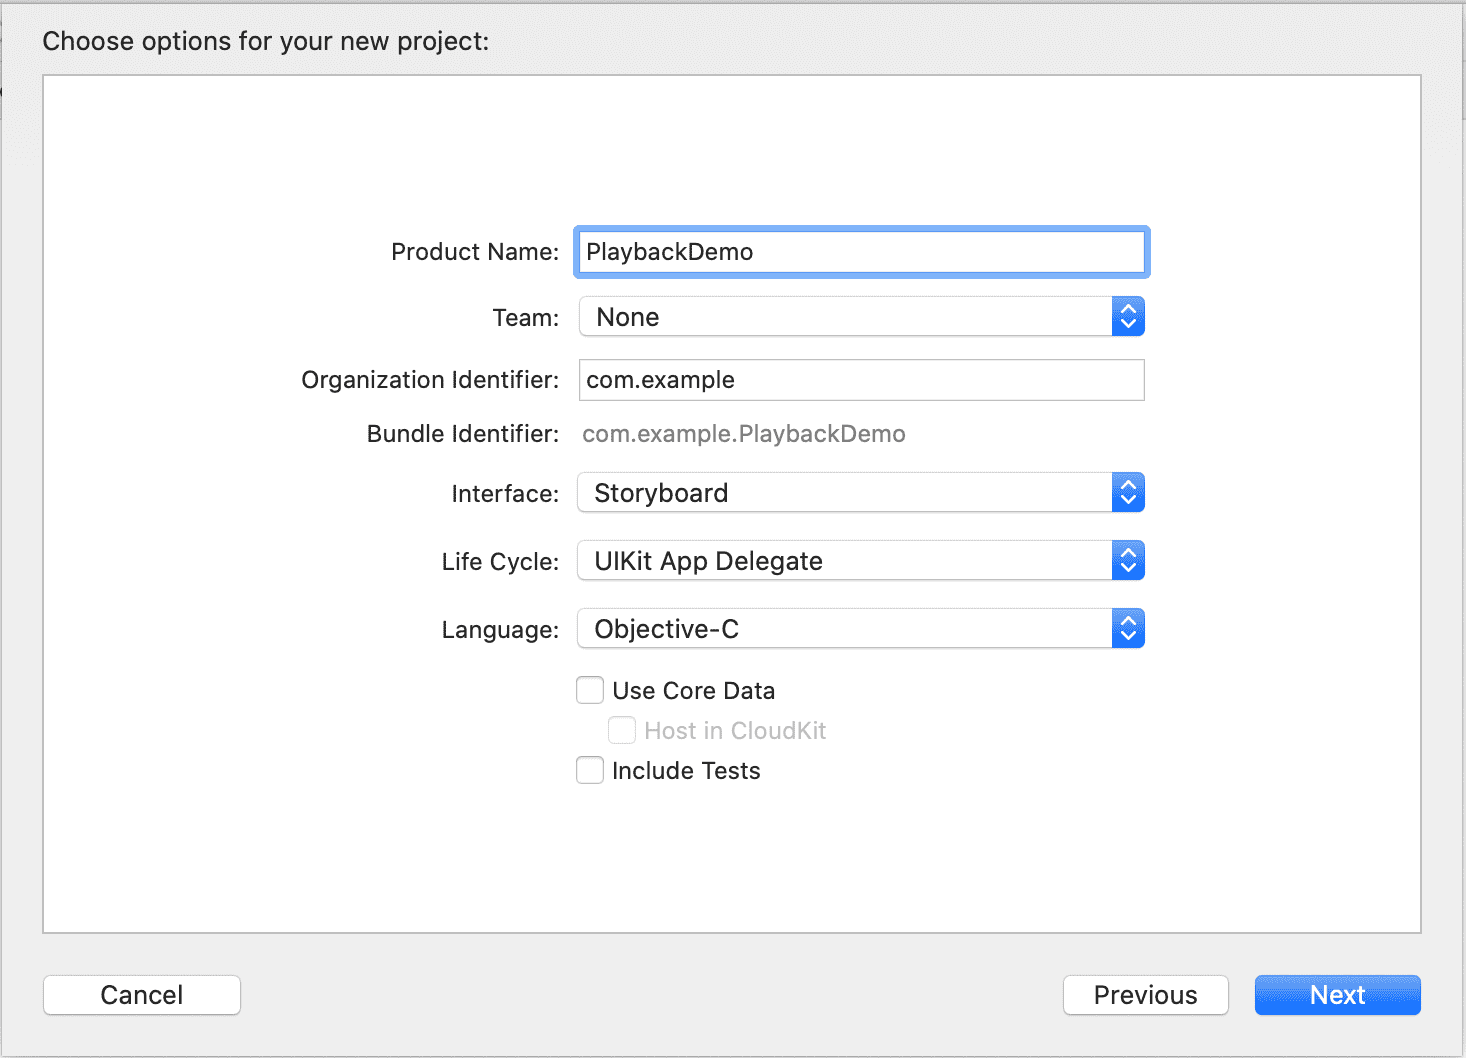
Add dependencies
Installing dependencies using CocoaPods
If your development environment is set up for it, you can use CocoaPods (opens new window) to install the Bambuser SDK:s.
Prepare the newly created project for CocoaPods use with
pod init.Add
pod 'libbambuser-ios', '1.0.4'to your Podfile.Run
pod installto fetch the SDK and configure the project.
Installing dependencies manually
The Bambuser playback library has the following dependencies:
AudioToolbox,AVFoundation,AVKit,CoreMedia,Foundation,libc++.tbdandUIKit.
Add the playback SDK
Log in to the Bambuser site and download the latest iOS SDK bundle from the Developer (opens new window) page.
Open up Finder and navigate to the download folder, then double click the SDK bundle to unzip it.
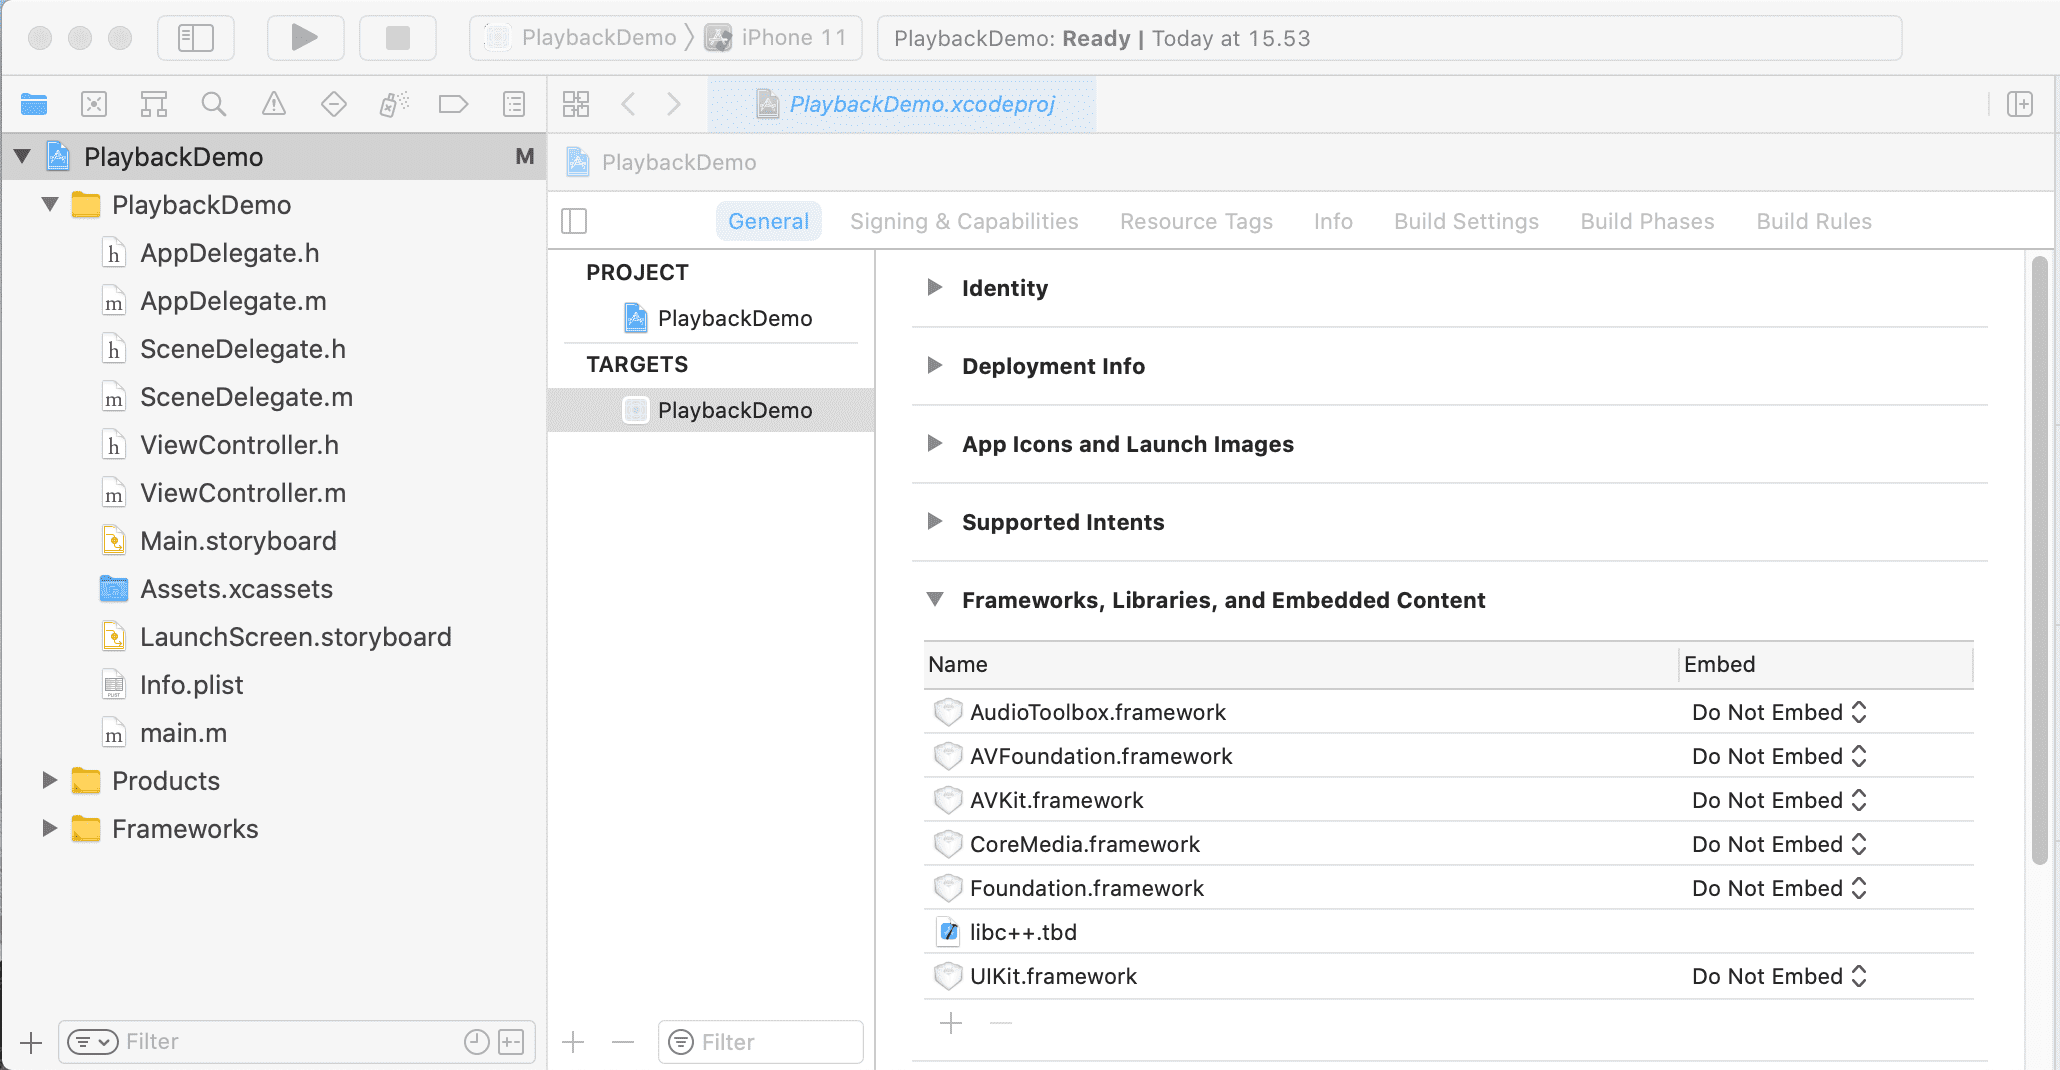
Go to the
Frameworksdirectory in the SDK bundle and dragBambuserPlayer.xcframeworkinto theFrameworkssection of your Xcode project's file tree navigator.
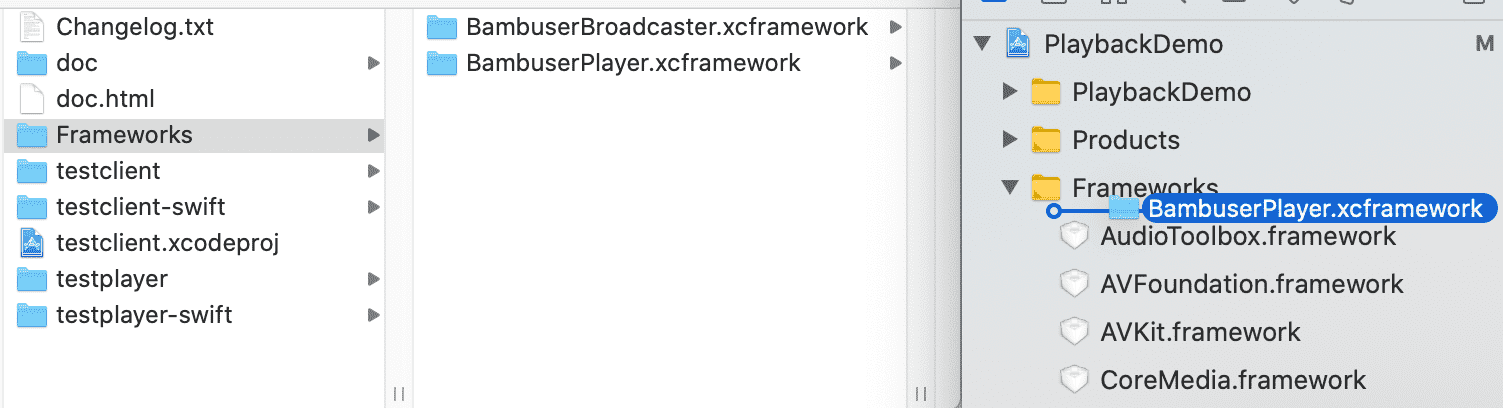
- Check
Copy items if neededto ensure that your project folder gets its own copy of the files.
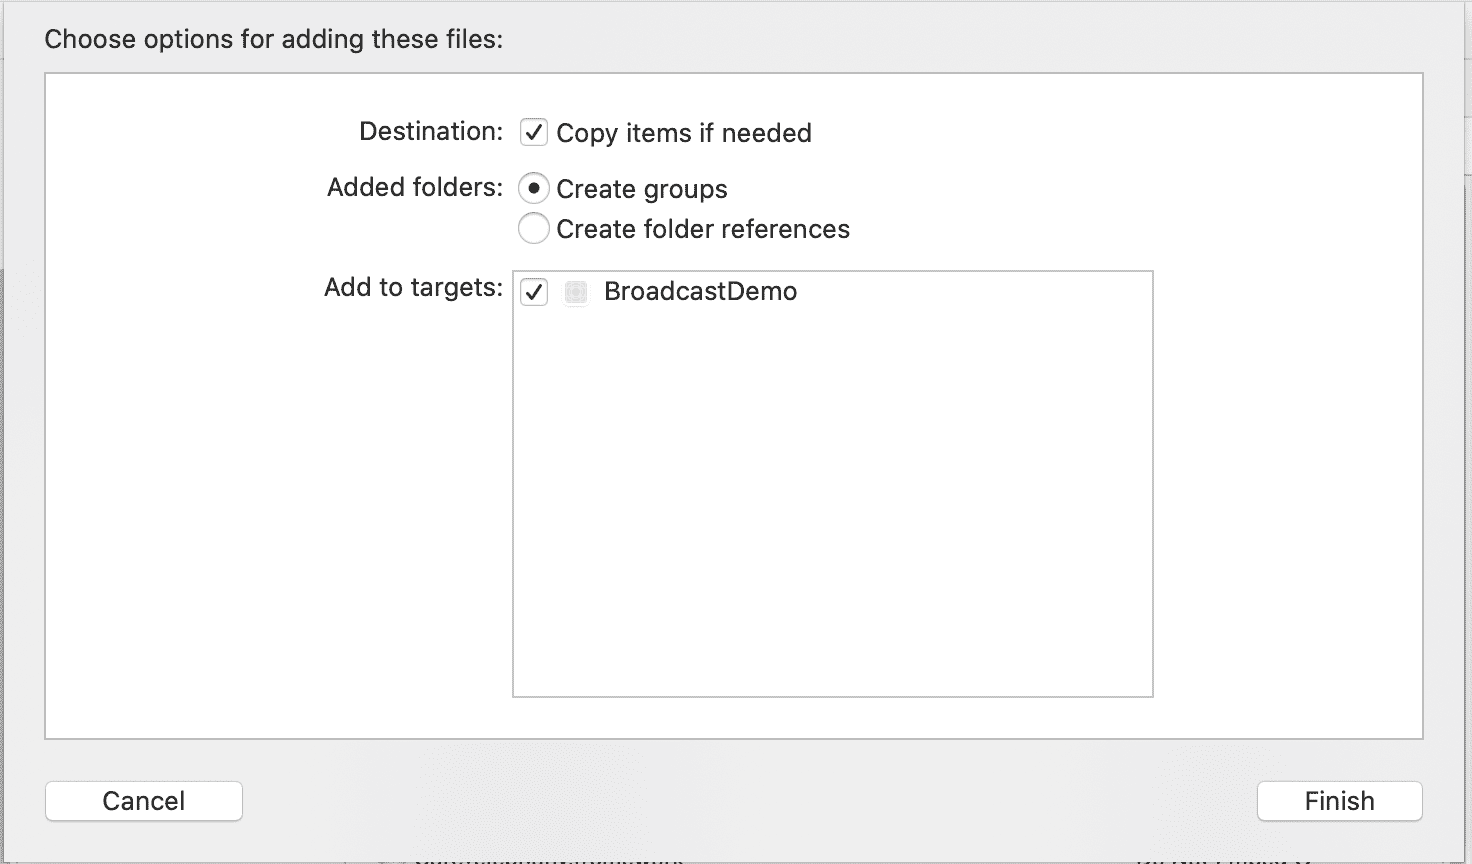
- The act of adding
BambuserPlayer.xcframeworkintoFrameworksshould also have addedBambuserPlayer.xcframeworktoFrameworks, Libraries and Embedded ContentunderGeneral.
Bootstrap the SDK
Now that you have installed the dependencies it's time to start using the SDK.
In ViewController.h import BambuserPlayer/BambuserPlayer.h and add a BambuserPlayer (opens new window)
to the interface.
#import <UIKit/UIKit.h>
#import <BambuserPlayer/BambuserPlayer.h>

@interface ViewController : UIViewController {
	BambuserPlayer *bambuserPlayer;
}

@end
In ViewController.m extend the viewDidLoad method to create an instance of
BambuserPlayer (opens new window) when the viewcontroller is loaded.
- (void) viewDidLoad {
	[super viewDidLoad];

	bambuserPlayer = [[BambuserPlayer alloc] init];
}
Add the player view
In ViewController.m in the viewDidLoad method, add the player view
to the view hierarchy.
[self.view addSubview:bambuserPlayer];
In ViewController.m add a viewWillLayoutSubviews method, then add some code
to ensure the player view is assigned the desired dimensions.
- (void) viewWillLayoutSubviews {
	float statusBarOffset = self.topLayoutGuide.length;
	bambuserPlayer.frame = CGRectMake(0, 0 + statusBarOffset, self.view.bounds.size.width, self.view.bounds.size.height - statusBarOffset);
}
Authentication
To be allowed to retrieve broadcasts, your app needs to identify itself to Bambuser.
Head over to the Developer (opens new window) page on the
Bambuser site and get the Sandbox application ID,
then assign it to BambuserPlayer (opens new window) in ViewController.m directly after initialization.
Note
Remember to replace the Sandbox id with a Production application ID before you release your app!
bambuserPlayer.applicationId = @"GFZalqkR5iyZcIgaolQmA";
We will also need a signed resource URI for the broadcast we want to play. For the scope of this guide, we will use a pre-signed resource URI supplied in the example application distributed with the Bambuser iOS SDK bundle. To learn how to sign your own resource URIs, refer to the chapter on Resource URI.
[bambuserPlayer playVideo: @"https://cdn.bambuser.net/broadcasts/ec968ec1-2fd9-f8f3-4f0a-d8e19dccd739?da_signature_method=HMAC-SHA256&da_id=432cebc3-4fde-5cbb-e82f-88b013140ebe&da_timestamp=1456740399&da_static=1&da_ttl=0&da_signature=8e0f9b98397c53e58f9d06d362e1de3cb6b69494e5d0e441307dfc9f854a2479"];
Add playback controls
Let's add some buttons to be able to control the playback.
In ViewController.h, declare the following buttons:
@interface ViewController : UIViewController {
	BambuserPlayer *bambuserPlayer;
	UIButton *rewindButton, *playButton, *pauseButton;
}
In ViewController.m, in the viewDidLoad method, initialize the buttons
and add them to the view hierarchy:
playButton = [UIButton buttonWithType: UIButtonTypeSystem];
[playButton setTitle:@"Play" forState: UIControlStateNormal];
[playButton addTarget:bambuserPlayer action:@selector(playVideo) forControlEvents:UIControlEventTouchUpInside];
[self.view addSubview: playButton];
pauseButton = [UIButton buttonWithType: UIButtonTypeSystem];
[pauseButton setTitle:@"Pause" forState: UIControlStateNormal];
[pauseButton addTarget:bambuserPlayer action:@selector(pauseVideo) forControlEvents:UIControlEventTouchUpInside];
[self.view addSubview: pauseButton];
rewindButton = [UIButton buttonWithType: UIButtonTypeSystem];
[rewindButton setTitle:@"Rewind" forState: UIControlStateNormal];
[rewindButton addTarget:self action:@selector(rewind) forControlEvents:UIControlEventTouchUpInside];
[self.view addSubview: rewindButton];
In ViewController.m, in the viewWillLayoutSubviews method, position
the buttons to taste
playButton.frame = CGRectMake(20, 20 + statusBarOffset, 100, 40);
pauseButton.frame = CGRectMake(20, 80 + statusBarOffset, 100, 40);
rewindButton.frame = CGRectMake(20, 140 + statusBarOffset, 100, 40);
Also add a new method to handle the rewind action
- (void) rewind {
	[bambuserPlayer seekTo: 0.0];
}
Subscribe to events
To know what's going on inside BambuserPlayer (opens new window), we should hook up ourself as
its delegate. In ViewController.m, assign self to bambuserPlayer.delegate
directly after initialization:
bambuserPlayer.delegate = self;
In ViewController.h, we now need to declare that we support the
BambuserPlayerDelegate (opens new window) protocol:
@interface ViewController : UIViewController <BambuserPlayerDelegate> {
Finally, we add a status callback method in ViewController.m:
- (void) playbackStatusChanged: (enum BambuserPlayerState) status {
	switch (status) {
	case kBambuserPlayerStatePlaying:
		playButton.enabled = NO;
		pauseButton.enabled = YES;
		break;

	case kBambuserPlayerStatePaused:
		playButton.enabled = YES;
		pauseButton.enabled = NO;
		break;

	case kBambuserPlayerStateStopped:
		playButton.enabled = YES;
		pauseButton.enabled = NO;
		break;
	case kBambuserPlayerStateError:
		NSLog(@"Failed to load video for %@", bambuserPlayer.resourceUri);
		break;

	default:
		break;
	}
}
Configuring AVAudioSession
Use AVAudioSession to configure the behavior of audio in the app. There are several possible categories you can choose from, but the AVAudioSessionCategoryPlayback (opens new window) is the most commonly used in a playback application. When using this category, audio continues with the Silent switch set to silent. If it is desired to honour the Silent switch then AVAudioSessionCategorySoloAmbient (opens new window)(deafult category) or AVAudioSessionCategoryAmbient (opens new window) are suitable options.
Read more about AVAudioSession in Apples documentation (opens new window).
[[AVAudioSession sharedInstance] setCategory: AVAudioSessionCategoryPlayAndRecord error: nil];
[[AVAudioSession sharedInstance] setActive: YES error: nil];
Putting it all together
The above steps should lead to a main view source somewhat along these lines:
ViewController.h
#import <UIKit/UIKit.h>
#import <BambuserPlayer/BambuserPlayer.h>

@interface ViewController : UIViewController <BambuserPlayerDelegate> {
	BambuserPlayer *bambuserPlayer;
	UIButton *rewindButton, *playButton, *pauseButton;
}

@end
ViewController.m
#import "ViewController.h"
#import <AVFoundation/AVFoundation.h>

@interface ViewController ()

@end

@implementation ViewController

- (void)viewDidLoad {
	[super viewDidLoad];
	// Do any additional setup after loading the view, typically from a nib.
    [[AVAudioSession sharedInstance] setCategory: AVAudioSessionCategoryPlayAndRecord error: nil];
    [[AVAudioSession sharedInstance] setActive: YES error: nil];

	bambuserPlayer = [[BambuserPlayer alloc] init];
	bambuserPlayer.delegate = self;
	bambuserPlayer.applicationId = @"GFZalqkR5iyZcIgaolQmA";
	[bambuserPlayer playVideo: @"https://cdn.bambuser.net/broadcasts/ec968ec1-2fd9-f8f3-4f0a-d8e19dccd739?da_signature_method=HMAC-SHA256&da_id=432cebc3-4fde-5cbb-e82f-88b013140ebe&da_timestamp=1456740399&da_static=1&da_ttl=0&da_signature=8e0f9b98397c53e58f9d06d362e1de3cb6b69494e5d0e441307dfc9f854a2479"];
	[self.view addSubview: bambuserPlayer];
	playButton = [UIButton buttonWithType: UIButtonTypeSystem];
	[playButton setTitle:@"Play" forState: UIControlStateNormal];
	[playButton addTarget:bambuserPlayer action:@selector(playVideo) forControlEvents:UIControlEventTouchUpInside];
	[self.view addSubview: playButton];
	pauseButton = [UIButton buttonWithType: UIButtonTypeSystem];
	[pauseButton setTitle:@"Pause" forState: UIControlStateNormal];
	[pauseButton addTarget:bambuserPlayer action:@selector(pauseVideo) forControlEvents:UIControlEventTouchUpInside];
	[self.view addSubview: pauseButton];
	rewindButton = [UIButton buttonWithType: UIButtonTypeSystem];
	[rewindButton setTitle:@"Rewind" forState: UIControlStateNormal];
	[rewindButton addTarget:self action:@selector(rewind) forControlEvents:UIControlEventTouchUpInside];
	[self.view addSubview: rewindButton];
}

 - (void) rewind {
	 [bambuserPlayer seekTo: 0.0];
 }

- (void) viewWillLayoutSubviews {
	float statusBarOffset = self.topLayoutGuide.length;
	bambuserPlayer.frame = CGRectMake(0, 0 + statusBarOffset, self.view.bounds.size.width, self.view.bounds.size.height - statusBarOffset);
	playButton.frame = CGRectMake(20, 20 + statusBarOffset, 100, 40);
	pauseButton.frame = CGRectMake(20, 80 + statusBarOffset, 100, 40);
	rewindButton.frame = CGRectMake(20, 140 + statusBarOffset, 100, 40);
}

- (void)didReceiveMemoryWarning {
	[super didReceiveMemoryWarning];
	// Dispose of any resources that can be recreated.
}

- (void) playbackStatusChanged: (enum BambuserPlayerState) status {
	switch (status) {
	case kBambuserPlayerStatePlaying:
		playButton.enabled = NO;
		pauseButton.enabled = YES;
		break;

	case kBambuserPlayerStatePaused:
		playButton.enabled = YES;
		pauseButton.enabled = NO;
		break;

	case kBambuserPlayerStateStopped:
		playButton.enabled = YES;
		pauseButton.enabled = NO;
		break;
	case kBambuserPlayerStateError:
		NSLog(@"Failed to load video for %@", bambuserPlayer.resourceUri);
		break;

	default:
		break;
	}
}

@end
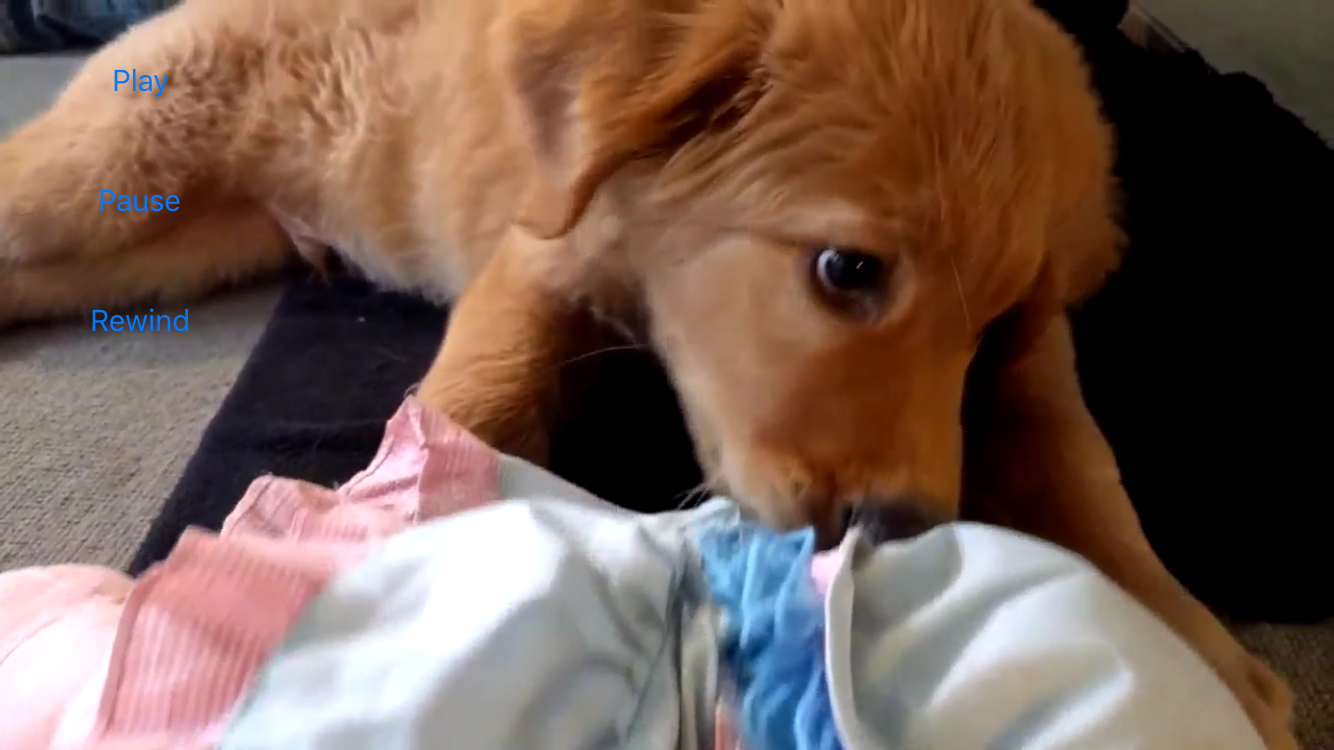
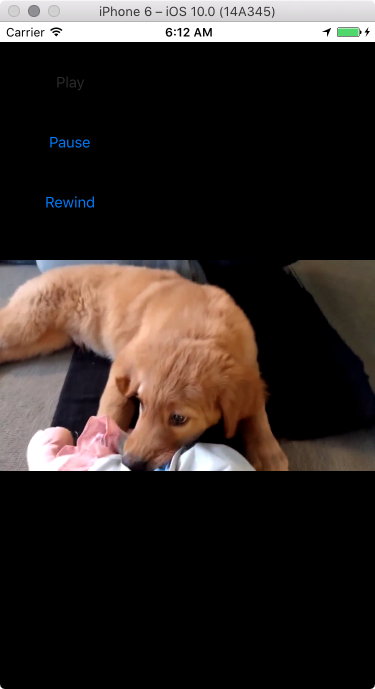
Testing in the simulator
To test in the simulator, we just select a suitable simulator device as a target and click run.
If your applicationId and resourceUri were valid, you should see something like this.
Testing on a device
How to configure Xcode for ad-hoc development is out of scope for this guide.
Assuming you have all the required privileges, you should be able to tether
your iOS device to Xcode and click run.
If your applicationId and resourceUri were valid, you should see something like this.