Player Integration in Android WebView
Overview
In this document, we briefly go through the steps to get started with integrating the Bambuser Live Video Shopping player into your native Android mobile app.
Requirements
- Your app supports WebViews
(or is web-based) A webpage embedding Bambuser Live Video Shopping player, which can be loaded inside the WebView
- Hosted and managed by you
- Includes JavaScript code for connecting the player with your app
Below we, step-by-step, show how to set up, embed and integrate the Bambuser Live Video Shopping player in your native Android App.
Getting started
Here you find a simple example project that can help you understand the implementation and get started with the technical integration quickly.
Android
- Kotlin
- Webview
- Interface class
- Helper methods
Embed HTML page
- To be embedded inside the webview
- Player configuration and event listener
- Sample show embedded
How it works
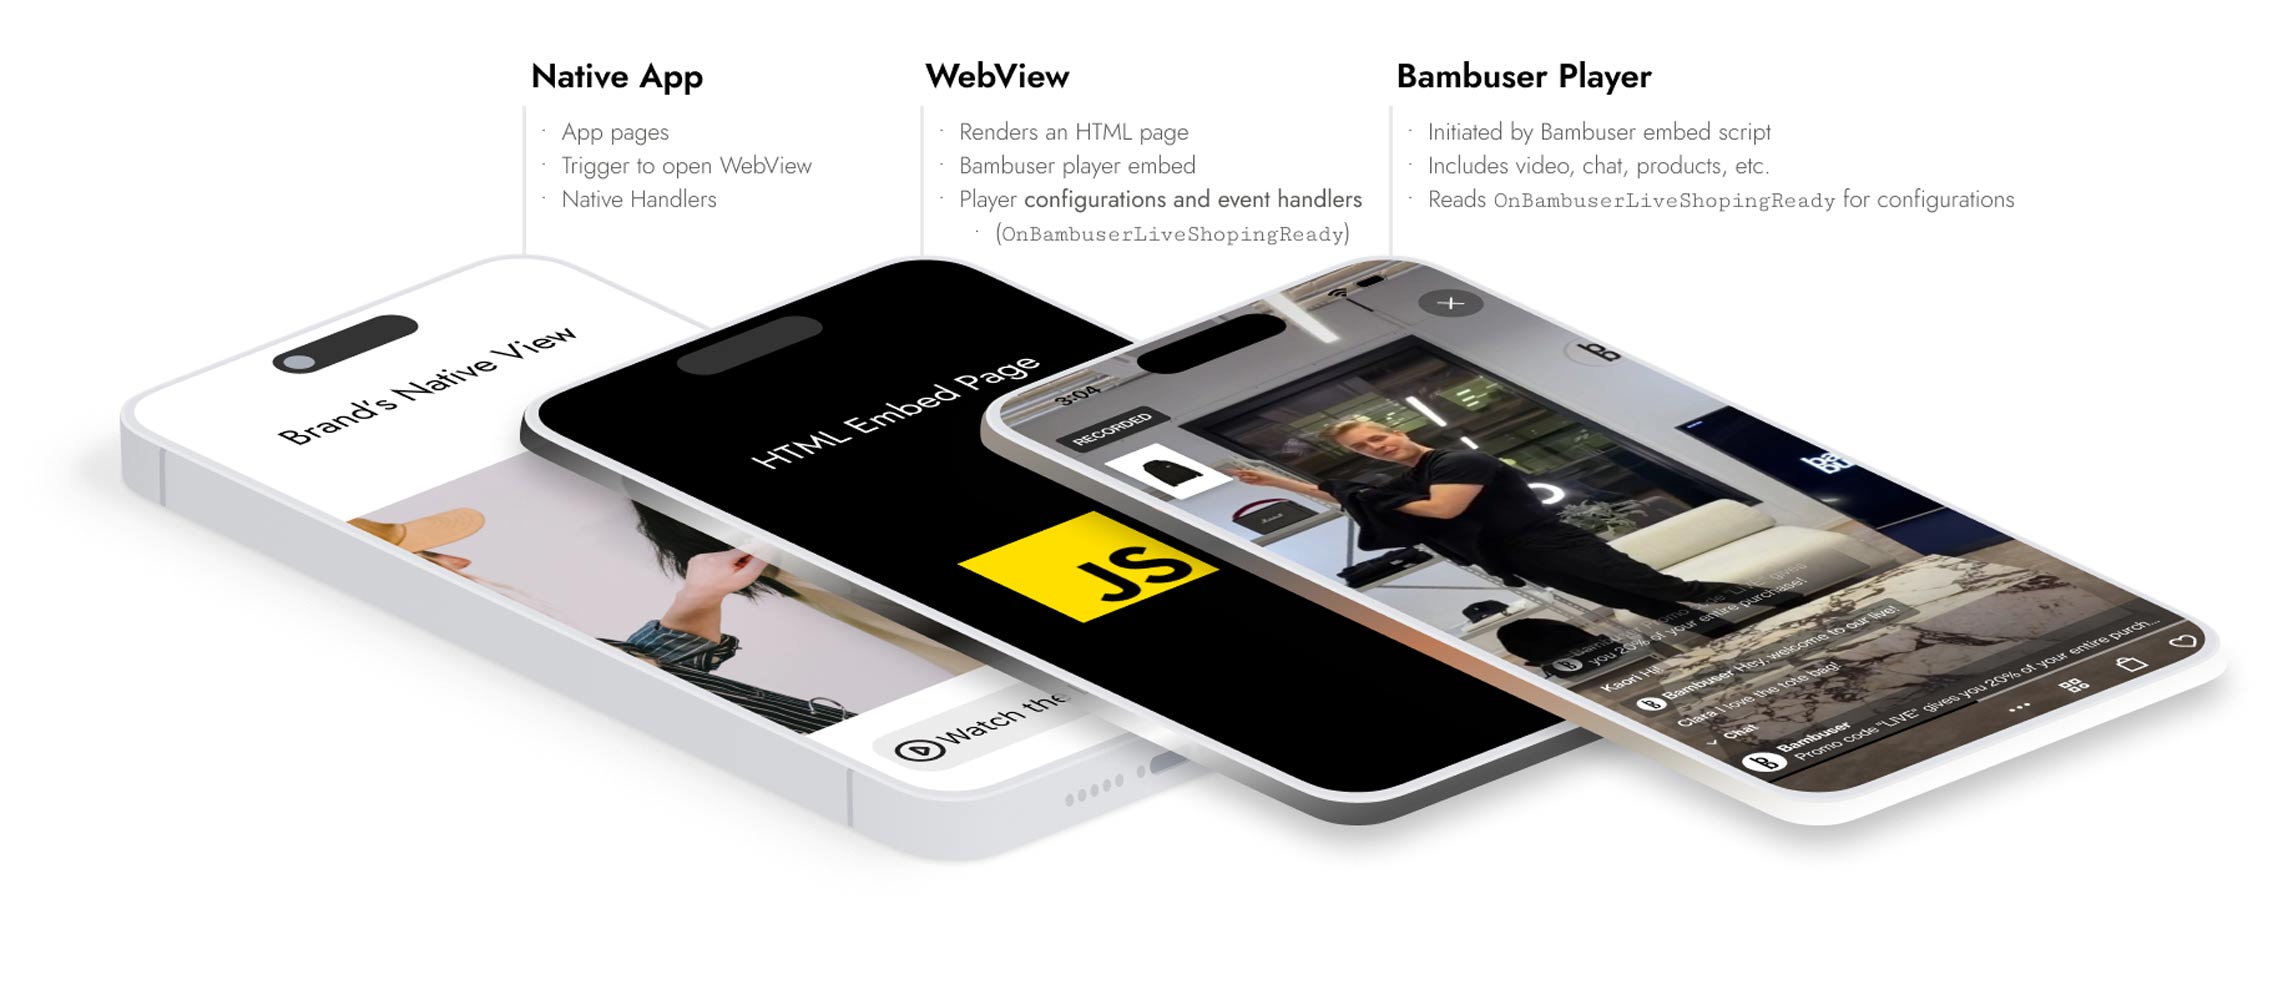
Because the Bambuser Live Video Shopping player is a web app, it works perfectly within a webview. Thanks to the ability of the common platforms to communicate between WebView and the native code, it is possible to utilize the Bambuser Player JavaScript API to configure and customize the behavior of the player inside the WebView.
Embed player on HTML page
Steps:
- Setup a webpage to embed inside the webview
- Hosted and managed on your side
- Embed the player on that webpage (Learn more)
Setup a webview
Steps:
- Create a new activity
- Add webview to the layout
- Set the landing page URL
- Enable JavaScript
- Attach the interface methods to the webview (Implemented on Handle WebView Events )
Example Code:
<?xml version="1.0" encoding="utf-8"?>
<FrameLayout xmlns:android="http://schemas.android.com/apk/res/android"
    xmlns:tools="http://schemas.android.com/tools"
    android:layout_width="match_parent"
    android:layout_height="match_parent"
    tools:context=".WebviewActivity">

    <WebView
        android:id="@+id/webview"
        android:layout_width="match_parent"
        android:layout_height="match_parent" />

</FrameLayout>
package com.example.bambuserwebview

import androidx.appcompat.app.AppCompatActivity
import android.annotation.SuppressLint
import android.os.Bundle
import android.view.View
import android.webkit.WebView

/**
 * An example full-screen activity that hides the system UI (i.e.
 * status bar and navigation/system bar) with user interaction.
 */
class WebViewActivity : AppCompatActivity() {

    override fun onCreate(savedInstanceState: Bundle?) {
        super.onCreate(savedInstanceState)

        if (BuildConfig.DEBUG) {
            //For the cases you wish to debug with Google Chrome
            WebView.setWebContentsDebuggingEnabled(true)
        }

        setContentView(R.layout.activity_webview)

        // Set up the user interaction to manually show or hide the system UI.
        webViewSetup()
    }

    @SuppressLint("SetJavaScriptEnabled")
    private fun webViewSetup() {
        val webView = findViewById<View>(R.id.webview) as WebView

        webView.apply {
            // Here are a list of URLs to a sample webview embed HTML page on different player states
            // Uncomment one at a time to test different scenarios
            // 1. Recorded show
            loadUrl("https://bambuser.github.io/bambuser-lvs-webview-examples/index.html")

            // 2. Live Show (fake live to test chat)
            //  loadUrl("https://bambuser.github.io/bambuser-lvs-webview-examples/index.html?mockLiveBambuser=true")

            // 3. Countdown screen / Scheduled show
            // loadUrl("https://bambuser.github.io/bambuser-lvs-webview-examples/index.html?showId=2iduPdz2hn6UKd0eQmJq")

            settings.javaScriptEnabled = true
        }

        // Attaching the WebViewInterface class to the webView JavaScript context
        // This will be used later in "Establish a JavaScript interface between native app and webview" step
        webView.addJavascriptInterface(WebViewInterface(this@WebViewActivity, this@WebViewActivity), "Android")

    }
}
<?xml version="1.0" encoding="utf-8"?>
<manifest xmlns:android="http://schemas.android.com/apk/res/android"
    package="com.example.bambuserwebview">

    <uses-permission android:name="android.permission.INTERNET" />

    <application
        android:label="@string/app_name"
        android:theme="@style/Theme.BambuserWebView">
        <activity android:name=".MainActivity"
            android:screenOrientation="portrait">
            <intent-filter>
                <action android:name="android.intent.action.MAIN" />
                <category android:name="android.intent.category.LAUNCHER" />
            </intent-filter>
        </activity>
        <activity
            android:name=".WebViewActivity"
            android:configChanges="orientation|keyboardHidden|screenSize"
            android:screenOrientation="portrait"
            android:label="@string/title_activity_webview">
        </activity>
    </application>

</manifest>
If you are having an issue with the keyboard covering the chat input, you need to disable the fullscreen setting for the webview activity.
Next, we will see how to communicate between the webview and the native functionalities.
Establish a JavaScript interface between native app and webview
There is a need to set up a data flow from the native app to the webview and vice versa.
Steps:
- Implement a
WebView Interfaceclass - Add your methods (Keep the
@JavascriptInterfaceannotation for each method) - Make sure you added the interface to the webview using the addJavascriptInterface method when initiating the webview
package com.example.bambuserwebview

import android.app.Activity
import android.content.Context
import android.webkit.JavascriptInterface

/** Instantiate the interface and set the context  */
class WebViewInterface(private val context: Context, private val activity: Activity) {

    // Methods defined here can be invoked within the Embed HTML page inside the webview

    //Example of a native handler
    @JavascriptInterface
    fun handleClose() {
        activity.finish();
    }

    // Example of providing data from the app to the webview (e.g. to configure the player translations)
    @JavascriptInterface
    fun getCurrentLocale(): String {
        return "en-US";
    }
}
Handle WebView Events
On the Embed HTML page, you can use the player API to handle different player events. Below we gathered the most common scenarios that are handled within the context of app integration.
Handle Add To Calendar
Event name: player.EVENT.SHOW_ADD_TO_CALENDAR
- When a shopper clicks on
Add to Calendarbutton inside the player
- Hide player's default calendar view
- Handle
player.EVENT.SHOW_ADD_TO_CALENDARevent to display native Add To Calendar view - HTML Embed
- Kotlin
// Inside onBambuserLiveShoppingReady

player.configure({
  ui: {
    hideAddToCalendar: true,
  },
});
// Inside onBambuserLiveShoppingReady

player.on(player.EVENT.SHOW_ADD_TO_CALENDAR, (event) => {
  console.log("SHOW_ADD_TO_CALENDAR", event);

  Android.addToCalendar(JSON.stringify(event));
});
// Example implementation of native add to calendar

@JavascriptInterface
fun addToCalendar(json: String) {
    try {
        JSONObject(json).let {
            AddToCalendarEvent(
                title = it.optString("title"),
                description = it.optString("description"),
                start = it.optString("start").toDate(),
                duration = it.optLong("duration"),
                url = it.optString("url")
            )
        }.let {
            val intent = Intent(Intent.ACTION_EDIT)
            intent.type = "vnd.android.cursor.item/event"
            intent.putExtra(CalendarContract.Events.TITLE, it.title)
            intent.putExtra(CalendarContract.Events.DESCRIPTION, it.description)
            intent.putExtra(CalendarContract.EXTRA_EVENT_BEGIN_TIME, it.start?.time)
            intent.putExtra(CalendarContract.EXTRA_EVENT_END_TIME, ((it.start?.time ?: 0L) + it.duration))
            intent.putExtra(CalendarContract.EXTRA_EVENT_ALL_DAY, false)
            context.startActivity(intent)
        }
    } catch (e: Exception) {
        Toast.makeText(context, "Could not add event to calendar", Toast.LENGTH_LONG).show()
    }
}
Handle Share
Event name: player.EVENT.SHOW_SHARE
- When a shopper clicks on
Sharebutton inside the player
- Hide player's default share view
- Handle
player.EVENT.SHOW_SHAREevent to display the native Share view - HTML Embed
- Kotlin
// Inside onBambuserLiveShoppingReady

player.configure({
  ui: {
    hideShareView: true,
  },
});
// Inside onBambuserLiveShoppingReady

player.on(player.EVENT.SHOW_SHARE, (event, callback) => {
  console.log("SHOW_SHARE", event); event,

  Android.share(JSON.stringify(event));
});
// Example implementation of native share handler

@JavascriptInterface
fun share(json: String) {
    try {
        ShareEvent(
            JSONObject(json).optString("url")
        ).let {
            val shareIntent = Intent(Intent.ACTION_SEND)
                .apply { type = "text/plain" }
                .also { intent ->
                    intent.putExtra(
                        Intent.EXTRA_TEXT,
                        it.url
                    )
                }
            context.startActivity(Intent.createChooser(shareIntent, "Insert your title here!"))
        }
    } catch (e: Exception) {
        Toast.makeText(context, "Could not perform sharing", Toast.LENGTH_LONG).show()
    }
}
Handle Product View
Event name: player.EVENT.SHOW_PRODUCT_VIEW
- When a shopper clicks on a product (whether from the product list or highlighted product).
- Override default product click behavior
- Handle
player.EVENT.SHOW_PRODUCT_VIEWevent to display your native PDP - HTML Embed
- Kotlin
// Inside onBambuserLiveShoppingReady

player.configure({
  buttons: {
    product: player.BUTTON.NONE,
  },
});
// Inside onBambuserLiveShoppingReady

player.on(player.EVENT.SHOW_PRODUCT_VIEW, (event) => {
  console.log("SHOW_PRODUCT_VIEW", event);

  Android.overlayProductView(event.sku);
});
// Example implementation of opening native PDP

@JavascriptInterface
fun overlayProductView(productSKU: String) {

    // TO DO:
    // Implement you own logic to overlay product view on top of the webview
  }
}
Handle Closing the Player
Event name: player.EVENT.CLOSE
- When a shopper closes the player.
- Make sure to configure the dismiss button as below
- Handle
player.EVENT.CLOSEto navigate shopper back to your native app - HTML Embed
- Kotlin
// Inside onBambuserLiveShoppingReady

player.configure({
  buttons: {
    dismiss: player.BUTTON.CLOSE,
  },
});
// Inside onBambuserLiveShoppingReady

player.on(player.EVENT.CLOSE, function () {
    Android.handleClose();
});
// Example implementation exiting the webview

@JavascriptInterface
fun handleClose() {
    activity.finish();
}
Setup Picture in Picture
We are currently working to incorporate these instructions into the main documentation above. In the meantime, please download the document below for instructions on how to set up Picture in Picture (PiP) for your Android WebView.
Download PIP Webview Instructions